This example demonstrates how to build an outbound workflow that returns abandoned calls on a priority basis according to customer status. This workflow makes use of the delay activity, populates custom variables with a specific format type, demonstrates enhanced email activity by adding attachments, and sends custom variable information to agents via enhanced screen pop.
Consider the following scenario:
Problem: A busy order desk is having trouble keeping up with customer requests. As a result, they are dealing with a high number of abandoned calls. Their customers are sorted into three priority levels: gold, silver, and bronze. Gold member callers are considered the highest priority and the order desk is obligated to return their calls expediently in order to meet service level agreements. Each day a SQL table is populated with all of the abandoned calls from the previous day including the customer’s priority levels. All gold customers must be called back.
Solution: The following outbound workflow is configured to search for customer numbers based on priority level, thus ensuring gold-level customer calls are returned expediently. In addition, customers are given options that can expedite call handling, resulting in a more efficient use of agent resources. For example, if callers are offered choices, besides the option of connecting with an agent, of being sent a PDF of their order status or listening to a message describing their balance and due date, some caller’s needs would be satisfied without having to speak to an agent. If callers choose to speak to an agent, specific caller information, for example, their status is delivered to the agent via a screen pop display when the agent connects to the call.
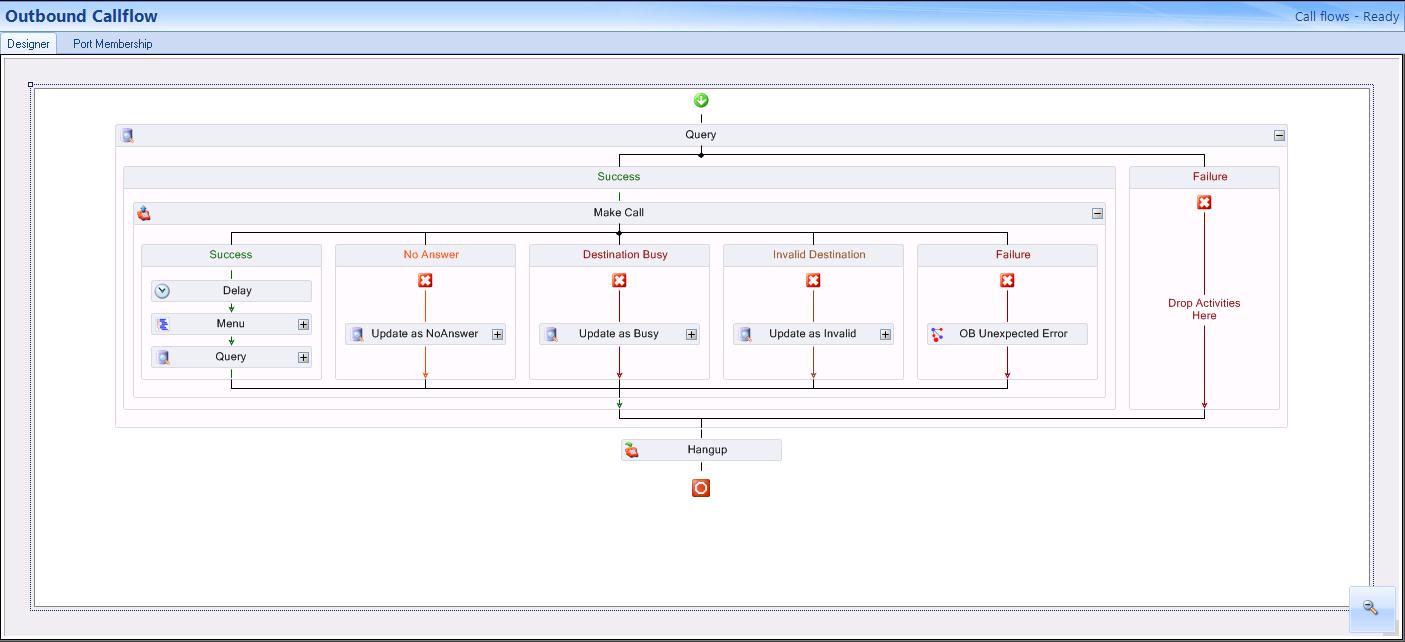
The following table depicts the final, post-configuration version of the Outbound workflow example described here.
Configuring a database provider
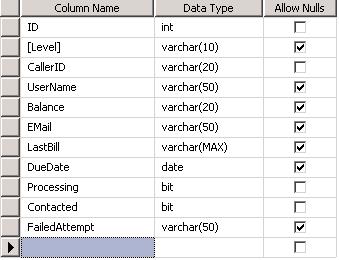
The first step in creating this workflow is to determine the source from where you will retrieve the numbers to call back. Typically the outbound call list is stored in a SQL database or an Excel spreadsheet. In this example, the following table was created in a SQL database. The example SQL database used in this sample workflow is named abandoned_caller. (See the following table.)
We recommend following standard database design practices when setting up your database. The example database referred to in this document is for demonstration purposes only.
| ID | [Level] | CallerID | UserName | Balance | |
|---|---|---|---|---|---|
| 100 | Gold | 3001 | Dave | 21.32 | [email protected] |
| 101 | Silver | 6132221212 | James | 201.55 | [email protected] |
| 102 | Bronze | 6135990000 | Curtis | 30 | [email protected] |
| ID | LastBill | DueDate | Processing | Contacted | FailedAttempt |
|---|---|---|---|---|---|
| 100 | \\share\bills\100bill.docx | April 20, 2012 | 0 | false | NULL |
| 101 | \\share\bills\100bill.docx | September 1, 2012 | 0 | false | NULL |
| 102 | \\share\bills\100bill.docx | Dec 12, 2012 | 0 | false | NULL |
The SQL data types used for this example are shown in the following figure.
The columns Processing and Contacted are added to the table to assist with call processing, as follows. The outbound workflow executes in an always-run fashion. If there are records present in the database and outbound ports are available, calls will be executed constantly. The processing column is used to flag a call as in progress. When a call is in progress, it means that the outbound port is currently calling that number. After the outbound workflow has completed, the contacted column is set to true. This process ensures callers, once contacted, are not called back.
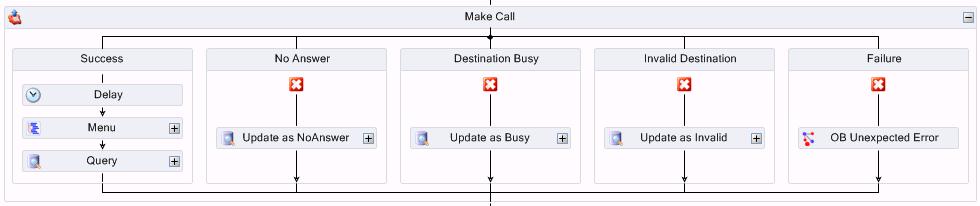
A FailedAttempt column is added to indicate the reason the attempt to call failed, for example, due to No Answer, Destination Busy, or Invalid Destination. The following figure displays an example of failed attempts as they display in the workflow.
You must configure a database provider to supply outbound call records to the Outbound workflow. This example uses a Microsoft SQL server as a data provider and names the data provider Abandon DB. See "Adding a Microsoft SQL server as a data provider".
Creating outbound ports
Outbound workflows and IVR Routing callbacks are both executed by the existing MiContact Center Outbound Router Service. Outbound port 5020 IP are used to process outbound workflows and IVR Routing callbacks.
Refer to the procedure "Adding extensions" and add the appropriate number of outbound ports. If you have any questions regarding the number of ports you require, contact the Systems Engineering Team.
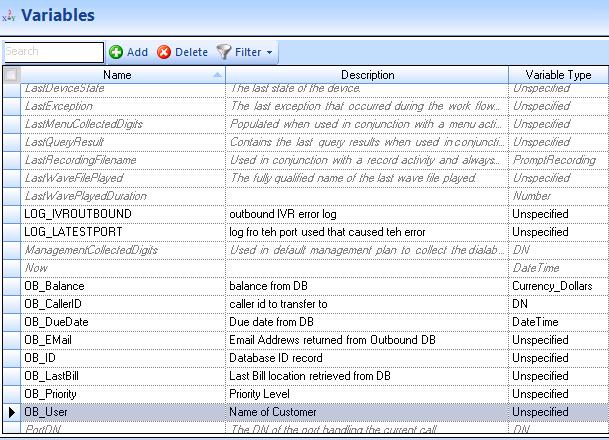
Defining variables
Before creating the workflow, define the variables that it will use. For this example, we have created the following variables from the above SQL database example table. Ensure the 'Send to Agent’s Desktop' check box is selected if you want customer-relevant database information to be available in a screen pop display for agents upon call receipt. (See the following figure.)
Creating an outbound workflow
Now that you have populated the table in the SQL database with abandoned interaction information, added a database provider and outbound ports, and created applicable variables, you can create the outbound workflow
- Click IVR Routing > Workflows.
- Click Add and select Mitel Voice > Outbound as the workflow type from the drop-down list.
- In the Properties pane, configure the workflow properties as needed.
Note:
To make the workflow active, select the Always run check box. When you no longer want the workflow to be active, deselect this option.
- Click Save.
Configuring the outbound workflow for abandoned interactions
The first steps in configuring the outbound workflow for use with abandoned interactions are to add a Query activity, a Make Call activity, and a Hang Up activity. The Make Call activity is used to place calls to external phone numbers that are typically stored in a data source, such as a SQL database or an Excel spreadsheet. The Query activity is used to retrieve the numbers from the database that are then stored in a variable which is accessed by the Make Call activity when dialing. The Make Call activity determines the location of the media server and provides the correct formatting for the external phone number before placing the call. In this example, the query looks for gold-level customers that require a return call.
- Add a Query activity and a Hang Up activity into the Workflows Canvas.
- Right-click the Query activity and select Edit Database Provider.
- Select the Abandon DB database provider created earlier.
- Click OK.
- Right-click the Query activity and select Edit Query Definition.
- Under Query type, select Advanced Query and, under Settings, enter the following SQL query(1):
SELECT top 1 * from dbo.abandoned_caller where level = ‘gold’ and processing = ‘0’ and contacted = ‘False’
UPDATE dbo.abandoned_caller set processing = 1 where id in (select top 1 id from dbo.abandoned_caller where level = ‘gold’ and processing = ‘0’)
- On the Variable Assignment tab, assign the appropriate variables to the parameters returned from the query(2).
The following figure displays steps 5-7.
Figure 5. Creating the advanced SQL query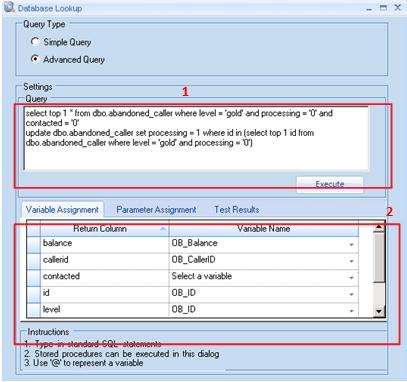
- In the Success branch of the Query activity, add a Make Call activity.
See the following figure.
Figure 6. Make Call activity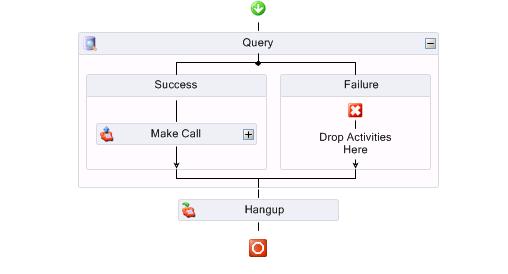
- Select the Make Call activity and configure the properties in the Properties pane.
- For this example, beside Destination, select the variable <<OB_CallerID>> and click OK.
- Select the External Call check box to indicate that these calls are external to the PBX. Outbound dialing digits are appended when dialing externally.
Note:
Outbound dialing digits must be programmed in YourSite Explorer for the media server upon which the outbound ports reside. This is configured in YourSiteMedia serversLocation tab.
Configuring the branches of the Make Call activity
If the query is successful, the outbound number variable will populate. The caller is then offered the option to speak with an agent, receive an email with account details, or listen to a message that includes their account balance and due date. If the query is unsuccessful, for example, if you are set up to call back gold-level callers and there are none available in the SQL database table, the failure branch is followed
In the Success branch of the Make Call activity three actions are performed: Delay, Menu, and Query. (See the following figure.)

- In the Success branch of the Make Call activity, add and configure properties for a Delay activity.
The Delay action is used to give the customer time to answer the phone and greet the caller. The delay value is set in seconds.
- Following the Delay activity, add a Menu activity.
- Right-click the Menu activity and add the three digit options as follows: 1. Speak with Agent, 2. Mail Last Record, and 3. Listen to balance and due date.
The customer will be able to select 1 to speak to an agent, 2 to receive an email containing their most recent account information, or 3 to hear a message regarding their account balance and due date.
See the following figure.
Figure 8. Menu activity options
- Add a Transfer activity under option 1, an Email activity under option 2, and a Play activity under option 3.
- Configure the Properties for the Transfer activity. Be sure to set the Destination to an ACD path.
- Configure the Properties for the Email activity. Select the SMTP Server address from the SMTP servers that were configured in YourSite Explorer during the software installation process.
For more information, see "Configuring the SMTP Server".
- Right-click the Email activity and select Edit Email Template.
- Right-click in the Configure email template window to see a list of available variables.
Note:
To ensure the email is sent to the customer, use the variables that were populated previously with the query action.
See the following figure.
Figure 9. Configuring the email template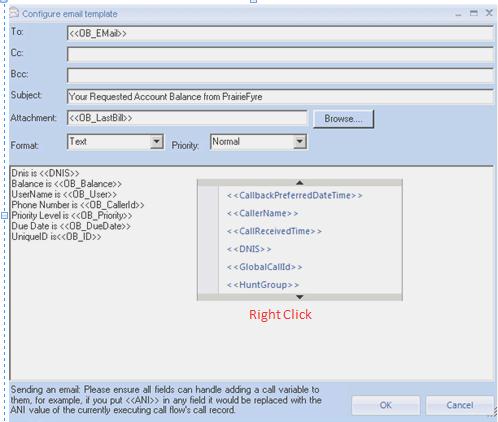
- Configure the Properties for the Play activity.
- Right-click the Play activity and select Greeting prompts > Add a new prompt.
The Prompt window opens.
You will configure the activity to play two custom .wav files and two prompts. The customer will hear their account balance and due date, based on the variables you associate with the prompts.
- Select the Variables tab.
See the following figure.
Figure 10. Configuring the Play activity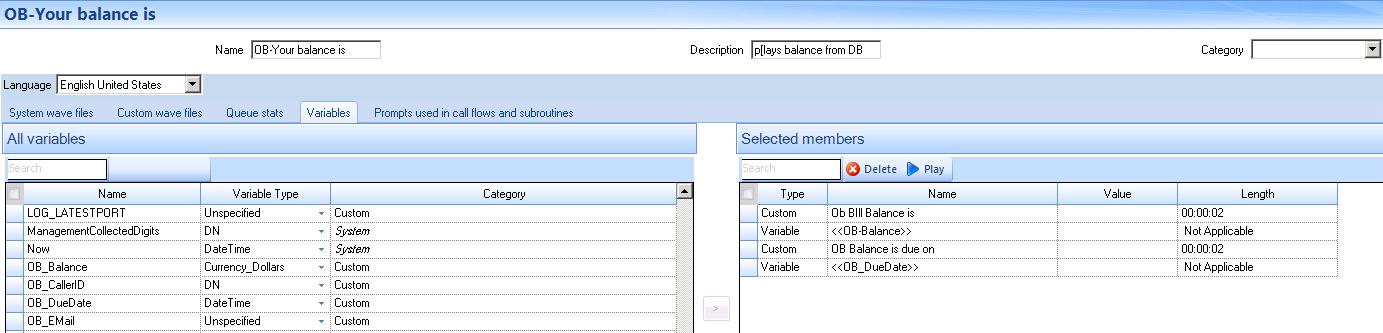
In this example, the OB_Balance variable is set as type ‘Date Time’ and the variable OB_Balance is set as type ‘Dollars’. These variables have an associated format type. The variable type ‘Date Time’ must be formatted to suit the variable populated from the database query. The available options display in the following figure.
Figure 11. Date format options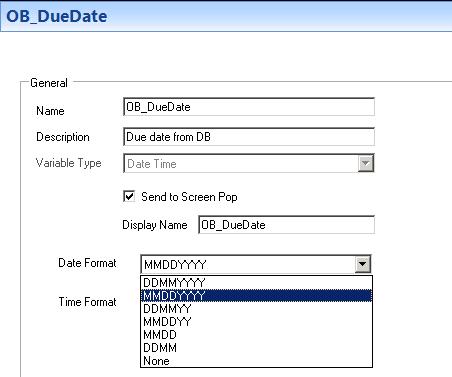
- Select MMDDYYY as the Date Format for the due date variable (OB_DueDate).
Note:
The balance due variable (OB_Balance) can have either Currency Format selected. The currency format is only used when writing data to a database.
- Configure the exception branches, Timeout, Invalid, and Failure, as needed.
- As a final step in configuring the success branch of the Make Call activity, under the Menu activity, add a Query activity.
This query updates the SQL table to indicate that the call has been completed, ensuring that number is not called again.
- Under No Answer, add and configure a Query activity that updates the customer status in the database to 'No Answer' when the customer does not answer the call. The next time this number is selected from the list, the system will attempt to call it again.
- Under Destination Busy, add and configure a Query activity that updates the customer status in the database to 'Destination Busy' when the busy signal is encountered. The next time this number is selected from the list, the system will attempt to call it again.
- Under Invalid Destination, add and configure a Query activity that updates the customer status in the database to 'Invalid' when the number called is out of service. The next time this number is selected from the list, the system will not attempt to call it.
- Under Failure, add and configure a Subroutine activity that advises the Administrator when there are problems with the workflow.
Adding this subroutine is recommended in order to help error proof the workflow.
After configuring the outbound workflow, associate it to a port. An outbound workflow cannot be associated to a hunt group. See "Associating workflows to devices".