After you create a web callback request page, you need to enable your web callback page to generate callback requests for your queues. This is done by adding an application pool for web callbacks and adding web callbacks as an application for your website in IIS and specifying in config.js which web callback workflow to use. Optionally, the default messages contacts receive after successfully submitting a callback or if their callback request fails to submit can be changed.
- Configured a web callback request page using the template
- Added the web callback template files into the desired directory
- Add the web callback application pool and configure the application settings
- Add the web callback as an application to your website
- Set the Enterprise Server for callbacks
- (Optional) Change the default web callback subroutine
- (Optional) Change the default success and failure messages
- Start IIS Manager.
- Under Connections, select Application Pools.
- In the Actions pane, select Add Application Pool….
- Under Name, add a name for the pool.
- Under .NET Framework version, select the most recent version of .NET Framework 4.5.
- Under Managed pipeline mode, select Classic.
- Click OK.
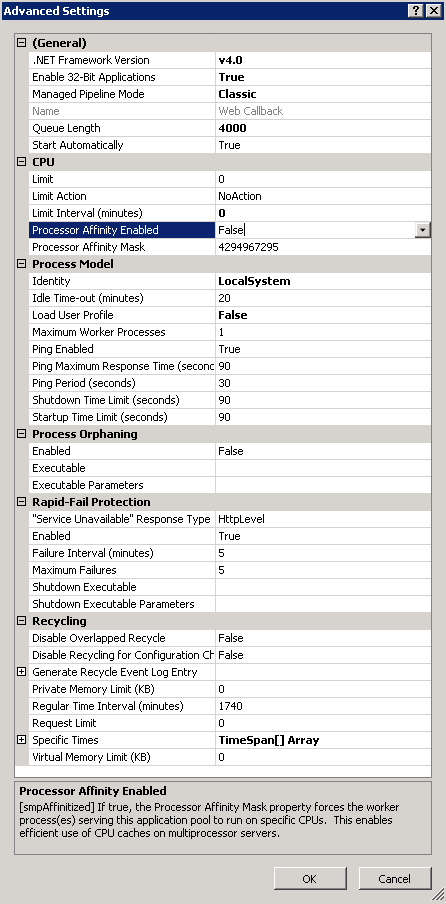
- Select the Application Pool and in the Actions pane, select Advanced Settings….
- Configure the settings to match the figure below.
Figure 1. Web callback Application Pools Advanced Settings
- Click OK.
- Start IIS Manager.
- In the Connections pane, navigate to Default Web Site.
- In the Actions pane, click View Applications.
- In the Actions pane, click Add Application….
- Under Alias, provide an alias.
- Click Select….
- Select the web callback application pool and click OK.
- Under Physical path, click … and navigate to the folder containing web.config and click OK.
- Click OK.
- Navigate to config.js and open in a text editor.
- Locate the following line of text:
var Config.EnterpriseServerAddress = "localhost";
- Replace localhost with your Enterprise Server's IP address.
- If the Enterprise Server was configured to use SSL during installation, locate the following line of text:
var Config.EnterpriseUsingSSL = false;
- Replace false with true.
- Save and close the text editor.
- Navigate to config.js and open in a text editor.
- Locate the following line of text:
var Config.OutboundCallbackSubroutineID = "B0AA4E0E-A97D-461E-A7F9-E32026C1FA40";
- Replace the value with the GUID of the subroutine from SQL.
The GUID can be obtained from tblConfig_VWM_Subroutine in SQL. See the procedure below for instructions on how to obtain this information.
- Save and close the text editor.
- Open SQL Server Management Studio or another SQL Management program.
- Query the following select statement:
select Pkey,Name from tblConfig_VWM_Subroutine
- Find your value for your web callback subroutine.
- Navigate to config.js and open in a text editor.
- Locate the following lines of text:
var Config.SuccessMessage = "Thanks, we will get in touch with you shortly.";
var Config.FailureMessage = "Sorry, we are having difficulties right now. Please try again.";
- Replace "Thanks, we will get in touch with your shortly." with the desired message for a successful callback submission.
- Replace "Sorry, we are having difficulties right now. Please try again." with the desired message for a failed callback submission.
- Save and close the text editor.