Interactive Contact Center enables supervisors, depending on their security settings, to control employees via the Contact Center Client and Ignite (WEB) employee and agent monitors. For example, if a supervisor notices a dramatic increase in the number of incoming emails in the Sales email queue, they can, using the agent monitor, remove the employee’s chat agent from their agent group in the Sales chat queue, ensuring that the employee can focus entirely on incoming emails.
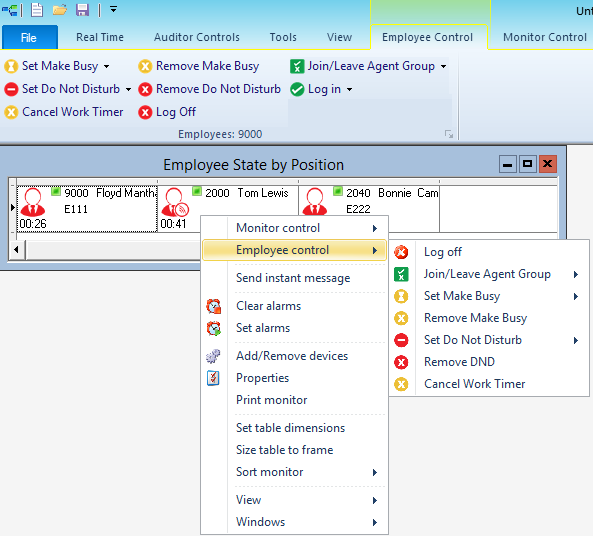
- Employee or Agent Control—Employee Control gives you control over individual employees and their agents. Employee monitor controls offer supervisors the greatest flexibility in controlling an employee and all of their agents. Supervisors can manage an employee`s availability, and all of an employee`s agents, or manage specific agents belonging to individual employees. (See the following figure.)
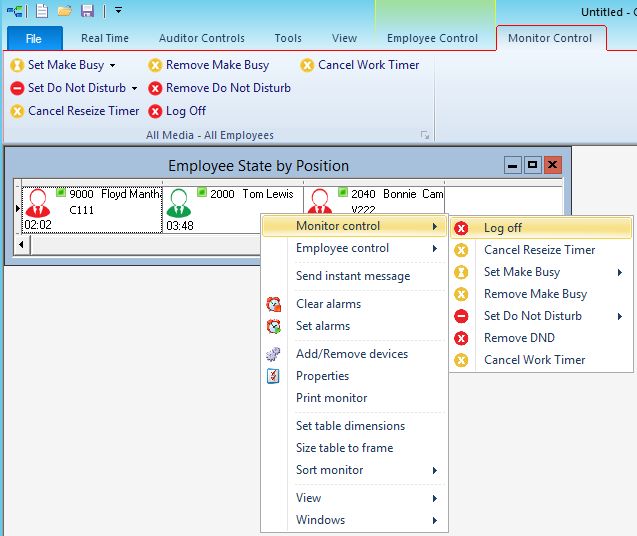
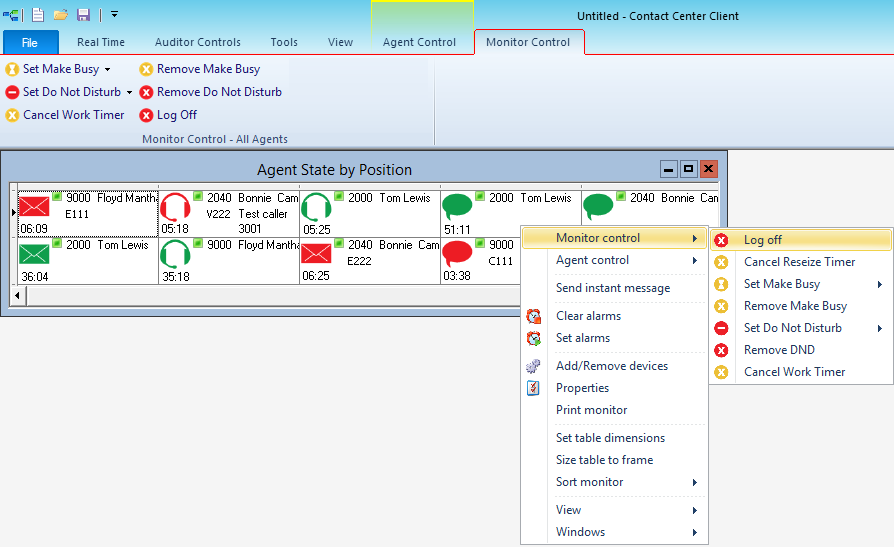
- Monitor Control—Monitor Control gives you control over all of the employees or agents on a monitor, enabling simultaneous management of presence for all employees or agents. (See the following figures.)
Context sensitivity and monitor control are not supported with Ignite (WEB). You can only alter the state for one employee or agent at a time.
- Employee State by Position
- Employee State by Time
- Employee State
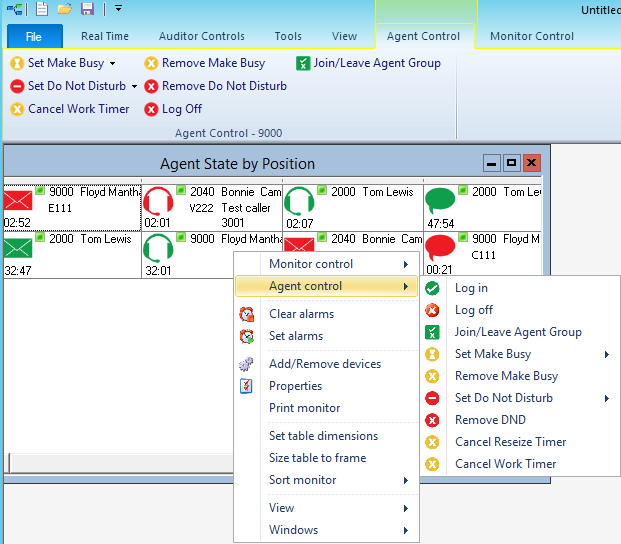
Agent Control gives you control over individual agents in an agent monitor. Agent monitor controls enable supervisors a more targeted look at specific aspects of an employee`s presence, enabling supervisors to limit their influence to specific agents or media types. Since agent monitors enable supervisors to view agents by agent group, Agent Control enables supervisors to better manage their agent groups. (See the following figure.)
- Agent State by Position
- Agent State by Time
- Agent State by Time for Queue
- Agent Shift
- Agent State
Logging on an agent - Contact Center Client
You log employee voice agents in and out in either an open Employee or Agent Monitor in Contact Center Client. Multimedia agents are not logged in with voice agents.
- Right-click the cell of an employee and click Employee control > Log in > voice agent. Alternatively, select the employee cell in an open monitor, click Log in from the Employee Control tab on the Contact Center Client ribbon, and select the voice agent.
- Right-click the cell of a voice agent who is not logged into and click Agent Control > Log in > voice agent. Alternatively, select the agent cell in an open monitor and click Log in from the Contact Center Client ribbon.
Logging off an agent - Contact Center Client
You can log off an employee from all media in an Employee monitor or Agent monitor. Logging off an agent logs off the employee’s voice agent and sets the employee’s multimedia agents to Absent in all their agent groups.
The following procedures take place in either an open Employee monitor or an open Agent monitor in Contact Center Client.
- Right-click the cell of an employee and click Employee control > Log off. Alternatively, select the employee cell in an open monitor and click Log Off from the Employee Control tab on the Contact Center Client ribbon.
To log off an agent in an open Agent monitor
Logging off an employee's agent logs off all of the employee's agents simultaneously.
- Right-click the cell of an agent and click Agent control > Log off. Alternatively, select the agent cell in an open monitor and click Log Off from the Agent Control tab on the Contact Center Client ribbon.
- Right-click the monitor and click Monitor control > Log off.
Alternatively, click the Monitor Control tab in the Contact Center Client ribbon and select Log Off.
- Click Yes.
- Right-click the monitor and click Monitor control > Log off.
Alternatively, click the Monitor Control tab in the Contact Center Client ribbon and select Log Off.
- Click Yes.
Logging on an agent - Ignite (WEB)
When you log on an agent in Ignite (WEB), you make them available to receive voice interactions.
The following procedure takes place in either an Agent State or Employee State monitor in Ignite (WEB).
- In the monitor, select the agent you want to log on.
- Click State > Available.
- Enter the agent’s extension and PIN (if enabled) and click Login.
Note:
This step is not required if the agent is set to automatically log in when the ‘Available’ state is selected.
Logging off an agent - Ignite (WEB)
When you log off an agent in Ignite (WEB), you make them unavailable to receive all media interactions, including voice, email, chat, SMS, and open media.
The following procedure takes place in either an Agent State or Employee State monitor in Ignite (WEB).
- In the monitor, select the agent you want to log off.
- Click State > Offline.
Joining and leaving agent groups - Contact Center Client
After logging into Contact Center Client, agents can use Interactive Contact Center to control their presence status in agent groups. Optionally, supervisors can use Interactive Contact Center to control the presence status of agents in specific agent groups.
- Right-click the cell of an employee and click Employee control > Join/Leave Agent Group > [Agent].
Alternatively, select the cell of an employee and in the Employee Control tab of the Contact Center Client ribbon, click Join/Leave agent group > [Agent].
- Select the agent group(s) to which you want the employee’s agent(s) to join or deselect the agent group(s) to have the employee’s agent(s) leave the agent groups.
- Click OK.
- Right-click the cell of an agent who is logged on and click Agent control > Join/Leave Agent Group.
Alternatively, select the cell of an agent and click Join/Leave Agent Group from the Agent Control tab in the Contact Center Client ribbon.
- Select the agent group(s) to which you want the agent(s) to join or deselect the agent group(s) to which you want the agent(s) to leave.
- Click OK.
Joining and leaving agent groups - Ignite (WEB)
After signing into Ignite (WEB) and logging into their phone, agents can use interactive Contact Center to control their presence in agent groups. Optionally, supervisors can use Interactive Contact Center to control the presence status of agents in specific agent groups from within the Agent and Employee State monitors in Ignite (WEB).
The following procedures take place in either an Agent State or Employee State monitor in Ignite (WEB).
- In the monitor, select the agent for which you want to modify agent group presence.
- Click Agent Groups.
- Hover over the agent group's avatar and select Join All.
- Click Update.
- In the monitor, select the agent for which you want to modify agent group presence.
- Click Agent Groups.
- Hover over the agent group’s avatar and select Leave All.
- Click Update.
- In the monitor, select the agent for which you want to modify agent group presence.
- Click Agent Groups.
- To join an agent to all agent groups, click Join All > Update.
- To remove an agent from all agent groups, click Leave All > Update.
- In the monitor, select the agent for which you want to modify agent group presence.
- Click Agent Groups.
- To become available to answer interactions of a specific media type, click the media icon in the agent group so the icon displays in blue.
- To become unavailable to answer interactions of a specific media type, click the media icon in the agent group so the icon displays in grey.
- Click Update.
Placing employees in Make Busy - Contact Center Client
Employees in Work Timer can apply Busy/Make Busy or DND, but will remain in a Work Timer state until the Work Timer expires or is cancelled. If Classification Codes are required for the queue and the Work Timer expires without a Classification Code being entered, a Non-Compliant Classification Code will be applied to the call..
Placing employees into Make Busy places both employees and all of their agents into Make Busy.
The following procedures take place in either an open Employee monitor or an open Agent monitor in Contact Center Client.
- Right-click the cell of an employee and click Employee control > Set Make Busy > reason code. Alternatively, select an empty cell in an open monitor and click Set Employee Make Busy > reason code from the Employee Control tab in the Contact Center Client ribbon.
- Right-click the monitor and click Monitor control > Set Make Busy > reason code. Alternatively, select an empty cell in an open monitor and click Set Make Busy > reason code from the Monitor Control tab in the Contact Center Client ribbon.
- Click Yes.
- Right-click the cell of an agent and click Agent control > Set Employee Make Busy > reason code. Alternatively, select the agent cell in an open monitor and click Set Employee Make Busy > reason code from the Agent Control tab in the Contact Center Client ribbon.
- Right-click the monitor and click Monitor control > Set Employee Make Busy > reason code. Alternatively, select an empty cell in an open monitor and click Set Make Busy > reason code from the Monitor Control tab in the Contact Center Client ribbon.
- Click Yes.
Removing employees from Make Busy - Contact Center Client
Removing employees from Make Busy removes both employees and all of their agents from Make Busy.
The following procedures take place in either an open Employee monitor or an open Agent monitor in Contact Center Client.
- Right-click the cell of an employee whose agents are in Make Busy and click Employee control > Remove Make Busy. Alternatively, select an empty cell in an open monitor and click Remove Make Busy from the Employee Control tab in the Contact Center Client ribbon.
- Right-click the cell of an employee who is in Make Busy and click Monitor control > Remove Make Busy. Alternatively, select an empty cell in an open monitor and click Remove Make Busy from the Monitor Control tab in the Contact Center Client ribbon.
- Click Yes.
- Right-click the cell of an agent in Make Busy and click Agent control > Remove Make Busy. Alternatively, select the agent cell in an open monitor and click Remove Make Busy from the Agent Control tab in the Contact Center Client ribbon.
- Right-click the cell of an employee and click Monitor control > Remove Make Busy. Alternatively, select an empty cell in an open monitor and click Remove Make Busy from the Monitor Control tab in the Contact Center Client ribbon.
- Click Yes.
Placing employees in Busy - Ignite (WEB)
Employees in Work Timer can apply Busy/Make Busy or DND, but will remain in a Work Timer state until the Work Timer expires or is cancelled. If Classification Codes are required for the queue and the Work Timer expires without a Classification Code being entered, a Non-Compliant Classification Code will be applied to the call..
Placing an employee into Busy places them in Busy across all media types for which they answer interactions. While in Busy, they can receive transferred multimedia interactions, however, inbound multimedia interactions will not be routed to them. They can also receive Non ACD voice interactions and pick interactions waiting in queue.
The following procedure takes place in either an Agent State or Employee State monitor in Ignite (WEB).
- In the monitor, select the employee you want to place in Busy.
- Click State > Busy….
- Choose a Busy code.
Removing employees from Busy - Ignite (WEB)
Removing employees from Busy re-enables them to answer inbound multimedia interactions and ACD calls.
The following procedure takes place in either an Agent State or Employee State monitor in Ignite (WEB).
- In the monitor, select the employee you want to remove from Busy.
- Under State, select an alternate state, or, click X button next to Busy... to remove the busy code.
Note:
Select Available if you want to make them available to receive interactions.
Placing employees in Do Not Disturb - Contact Center Client
- Employees in Work Timer can apply Busy/Make Busy or DND, but will remain in a Work Timer state until the Work Timer expires or is cancelled. If Classification Codes are required for the queue and the Work Timer expires without a Classification Code being entered, a Non-Compliant Classification Code will be applied to the call..
Placing employees into Do Not Disturb places employees and all of their agents into Do Not Disturb.
The following procedures take place in either an open Employee monitor or an open Agent monitor in Contact Center Client.
- Right-click the cell of an employee and click Employee Control > Set Do Not Disturb > reason code. Alternatively, select the employee cell in an open monitor and click Set Employee Do Not Disturb > reason code.
- Right-click the monitor and click Monitor control > Set Do Not Disturb > reason code. Alternatively, select an empty cell in an open monitor and click Set Do Not Disturb from the Monitor Control tab in the Contact Center Client ribbon.
- Click Yes.
- Right-click the cell of an agent who is logged on and click Agent control > Set Employee Do Not Disturb > reason code. Alternatively, select the agent cell in an open monitor and click Set Do Not Disturb > reason code from the Agent Control tab in the Contact Center Client ribbon.
- Right-click the monitor and click Monitor control > Set Do Not Disturb > reason code. Alternatively, select an empty cell in an open monitor and click Set Do Not Disturb from the Monitor Control tab in the Contact Center Client ribbon.
- Click Yes.
Removing employees from Do Not Disturb - Contact Center Client
Removing employees from Do Not Disturb removes employees and all of their agents from Do Not Disturb.
The following procedures take place in either an open Employee monitor or an open Agent monitor in Contact Center Client.
- Right-click the cell of an employee who is in Do Not Disturb and click Employee control > Remove Do Not Disturb. Alternatively, select the employee cell in and click Remove Do Not Disturb from the Employee Control tab in the Contact Center Client ribbon.
- Right-click the monitor and click Monitor control > Remove Do Not Disturb. Alternatively, select an empty cell in an open monitor and click Remove Do Not Disturb from the Monitor Control tab in the Contact Center Client ribbon.
- Right-click the cell of an agent who is in Do Not Disturb and click Agent control > Remove Do Not Disturb. Alternatively, select the agent cell in an open monitor and click Remove Do Not Disturb from the Agent Control tab in the Contact Center Client ribbon.
- Right-click the monitor and click Monitor control > Remove Do Not Disturb. Alternatively, select an empty cell in an open monitor and click Remove Do Not Disturb from the Monitor Control tab in the Contact Center Client ribbon.
Placing employees in Do Not Disturb - Ignite (WEB)
Employees in Work Timer can apply Busy/Make Busy or DND, but will remain in a Work Timer state until the Work Timer expires or is cancelled. If Classification Codes are required for the queue and the Work Timer expires without a Classification Code being entered, a Non-Compliant Classification Code will be applied to the call..
Placing an employee into Do Not Disturb places them in Do Not Disturb across all media types for which they answer interactions. While in Do Not Disturb, they are unable to receive inbound multimedia interactions and internal voice interactions, including transfers.
The following procedure takes place in either an Agent State or Employee State monitor in Ignite (WEB).
- In the monitor, select the employee you want to place in Do Not Disturb.
- Under State, click Do Not Disturb….
- Choose a DND code.
Removing employees from Do Not Disturb - Ignite (WEB)
Removing employees from Do Not Disturb re-enables them to receive interactions for all applicable media types.
The following procedure takes place in either an Agent State or Employee State monitor in Ignite (WEB).
- In the monitor, select the employee you want to remove from Do Not Disturb.
- Under State, select an alternate state, or, click X button next to Do Not Disturb... to remove the DND Reason code.
Note:
Select Available if you want to make them available to receive interactions.
Canceling Work Timer for employees - Contact Center Client
Employees in Work Timer can apply Busy/Make Busy or DND, but will remain in a Work Timer state until the Work Timer expires or is cancelled. If Classification Codes are required for the queue and the Work Timer expires without a Classification Code being entered, a Non-Compliant Classification Code will be applied to the call..
In an Employee monitor or Agent monitor, you can cancel Work Timer for one or more employees. The following procedures take place in either an open Employee monitor or an open Agent monitor in Contact Center Client.
- Right-click the cell of an employee who is in Work Timer and click Employee control > Cancel Work Timer. Alternatively, select the employee cell in an open monitor and click Cancel Work Timer in the appropriate media section of the Employee Control tab in the Contact Center Client ribbon.
- Right-click the monitor and click Monitor control > Cancel Work Timer. Alternatively, select an empty cell in an open monitor and click Cancel Work Timer in the media type’s section of the Monitor Control tab in the Contact Center Client ribbon.
- Right-click the cell of an agent who is in Work Timer and click Agent control > Cancel Work Timer. Alternatively, select the agent cell in an open monitor and click Cancel Work Timer from the Agent Control tab in the Contact Center Client ribbon.
- Right-click the monitor and click Monitor control > Cancel Work Timer. Alternatively, select an empty cell in an open monitor and click Cancel Work Timer from the Monitor Control tab in the Contact Center Client ribbon.
Canceling Work Timer for employees - Ignite (WEB)
Employees in Work Timer can apply Busy/Make Busy or DND, but will remain in a Work Timer state until the Work Timer expires or is cancelled. If Classification Codes are required for the queue and the Work Timer expires without a Classification Code being entered, a Non-Compliant Classification Code will be applied to the call..
The following procedure takes place in either an Agent State or Employee State monitor in Ignite (WEB).
- In the monitor, select the employee you want to remove from Work Timer.
- Click State and select an alternate state.
Note:
Select Available if you want to make them available to receive interactions.