Installing the Battery String
Use one of the following material sets when installing the batteries:
|
BKB 201 003/1 Material set for 48 V 31-Ah battery |
|||
|---|---|---|---|
|
Pos. |
Title/Function |
Product Number |
Quantity |
|
A |
Battery set |
BKC 508 03/1 |
4 |
|
Mounting set for battery |
NTM 144 265 |
1 |
|
|
BKB 201 003/2 Material set for 48 V 62-Ah battery |
|||
|---|---|---|---|
|
Pos. |
Title/Function |
Product Number |
Quantity |
|
A |
Battery set |
BKC 508 03/2 |
4 |
|
Mounting set for battery |
NTM 144 265 |
1 |
|
|
NTM 144 265 Mounting set for battery |
|||
|---|---|---|---|
|
Pos. |
Title/Function |
Product Number |
Quantity |
|
B |
SCREW M 8X25 |
2 |
|
|
C |
SCREW M 8X16 |
8 |
|
|
D |
TUBE SPACER 18 X16 metal |
2 |
|
|
E |
CONTACT WASHER for 6.3-mm flat lug terminals |
3 |
|
|
F |
PLAIN WASHER |
8 |
|
|
G |
SPRING WASHER |
8 |
|
|
H |
CONNECTOR BRIDGE |
3 |
|
|
I |
INSULATING COVER for plus and minus terminals |
2 |
|
|
K |
Set of spacers 10-mm for separating battery blocks |
1 |
|
|
L |
Grey double-insulated cable, 10 mm 2area, 2 m long, (plus pole). (not UK) |
1 |
|
|
M |
Black double-insulated cable, 10 mm 2area, 2 m long, (minus pole). (not UK) |
1 |
|
|
Battery service instruction sheet in a frame for wall mounting |
1 |
||


To mount the batteries in the battery shelf, perform the following steps:
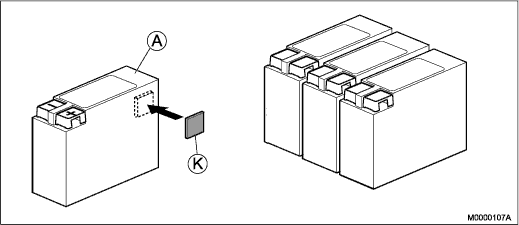
- Mount the spacers (K) between the battery blocks (A), see Figure 1.
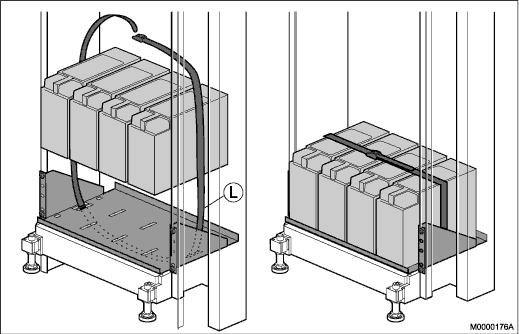
- Place the safety strap through the slots in the battery shelf, see Figure 3.
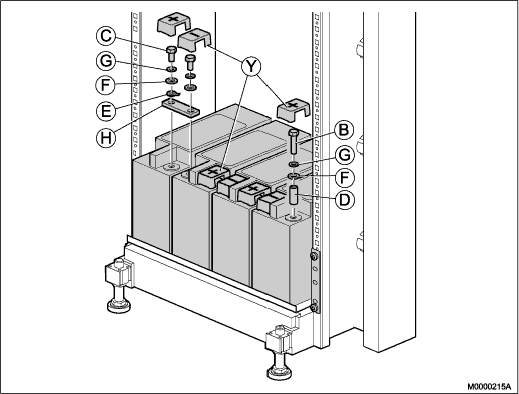
- Place the batteries on the shelf, see Figure 2. Make sure the front side of the batteries with the contact poles and the labels is facing the cabinet front.
- Pull the batteries towards the shelf front edge.
- Connect the batteries to each other by applying the connector bridge (H), plain washer (F), spring washer (G), by using the pole screws (C) from the batteries.
- For measuring 12, 24, and 36 V DC insert three contact washers with flat lug terminals (E) on top of each connector bridge.
- Tighten the six screws.
- Apply the metal tube spacer (D), plain washer (F), spring washer (G), and 25-mm screw (B) on the plus pole of the rightmost battery block (do not tighten).
- Apply the metal tube spacer (D), plain washer (F), spring washer (G), and 25-mm screw (B) on the minus pole of the leftmost battery block (do not tighten).
- Position insulating pole covers (Y) on each of the four batteries, and press them down.
- Place the strapping belt (L) around the batteries and tighten the strap, see Figure 3.
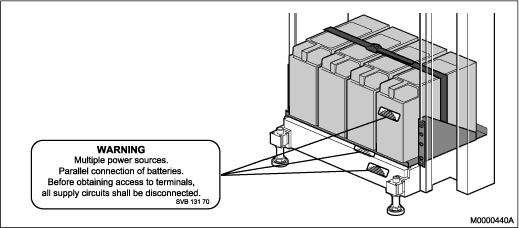
- Fasten three warning labels, parallel connection of batteries (SVB 131 70), one on the right-hand side battery, and two at the bottom of the cabinet, see Figure 4 and see Figure 1.Figure 3. Battery String Safety Strap
 Figure 4. Parallel Connection of Batteries Warning Label