Installing MX-ONE on Proxmox VE
Prerequisite
Ensure that you have downloaded and installed the Proxmox VE on your system. For more information, refer to the https://www.proxmox.com/en/proxmox-virtual-environment/get-started.
Ensure that you have downloaded the ISO image file. For example, Recovery_Image-MX-ONE_x.x.spx.hfx.rcx.iso.
Ensure that you have downloaded the either of the following checksum file.
Recovery_Image-MX-ONE_x.x.spx.hfx.rcx.iso.sha256
(Or)Recovery_Image-MX-ONE_x.x.spx.hfx.rcx.iso.md5
Uploading ISO Image on Proxmox VE
To upload ISO image on Proxmox VE:
Log in to the Proxmox VE.
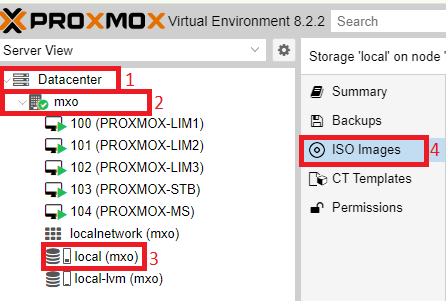
On Proxmox VE homepage, navigate to Datacenter.
- Select the appropriate project and click on ISO Images as depicted in the following figure.Figure 1. Uploading ISO Image
Click on Upload. The Upload pop-up window appears.
- Click on Select File, and select the Recovery_Image-MX-ONE_x.x.spx.hfx.rcx.iso file that you have already downloaded in Prerequisite.Note: The following procedure describes the sha256 file configuration. The same procedure can be used for the md5 file.
Set Hash algorithm as SHA-256.
- Configure the Checksum value.
Open the Recovery_Image-MX-ONE_x.x.spx.hfx.rcx.iso.sha256 file that you have already downloaded in Prerequisite.
Copy the hash value. For example, 7b3b3234b303ebe344bc0da8dc8663437612d0837a510a73629eb2123ec1b861.
Paste the hash value in Checksum.
Click on Upload.
After the iso file is uploaded, it will be displayed on the ISO images window.
Creating VM for MX-ONE on Proxmox VE
To create VM for MX-ONE on Proxmox VE:
Log in to the Proxmox VE.
On right top corner, click on Create VM.
The Create: Virtual Machine pop-up window is displayed.Configure General:
Set Name as environment specific value. For example PROXMOX-LIM1.
Click on Next.
Configure OS:
Set ISO image as Recovery_Image-MX-ONE_xx.spx.hfx.rcx.iso from the drop-down menu.
Click on Next.
Verify the System configurations and click on Next.
Configure Disks:
On Disk panel, set Disk size (GiB) as environment specific value.
Click on Next.
Configure CPU:
Set Cores as environment specific value.
Click on Next.
Configure Memory:
Set Memory (MiB) as environment specific value.
Click on Next.
Verify the Network configurations and click on Next.
On Confirm page, verify the configuration and click on Finish.
After few minutes, the PROXMOX-LIM1 VM is successfully created and displayed on the home page.
Installing MX-ONE on Proxmox VE
To install MX-ONE on Proxmox VE:
On Proxmox VE homepage, navigate to Datacenter.
Select the VM created in Creating VM for MX-ONE on Proxmox VE.
Right click on the VM (For example, 100 (PROXMOX-LIM1)) and select Start.
Click on Console.
The command prompt is displayed.- Execute the following command and press Enter key to start the installation.The installation takes around 10 minutes.
install After successful installation, configure the MX-ONE as described in the Installing and Configuring MX-ONE.