Fault Code 1:38 - Linux Software Raid Alert
Fault Code Description
The Raid disk supervision program has received an alert that the Linux Software Raid system needs attention.
All raid management requires root authority .
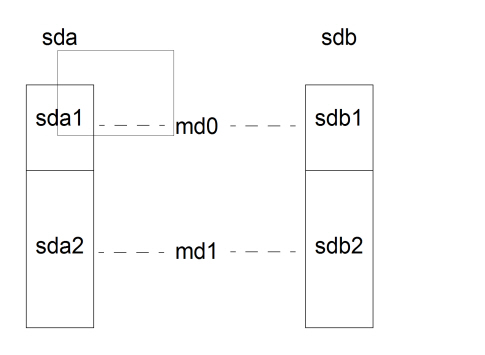
Schematic layout
The Linux software RAID system is made up by two disks, normally named sda and sdb. Each disk has two partitions, sda1 and sda2, and sdb1 and sdb2, respectively.
The RAID partition md0 is made up by sda1 and sdb1. The RAID partition md1 is made up by sda2 and sdb2.
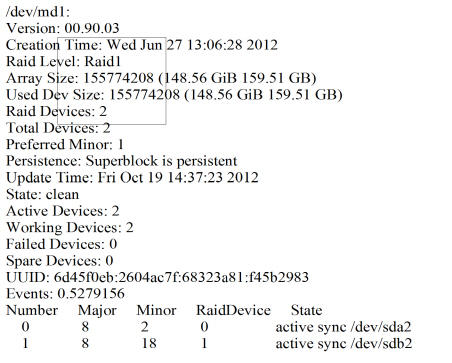
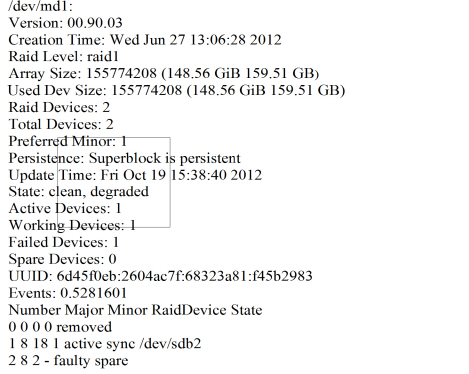
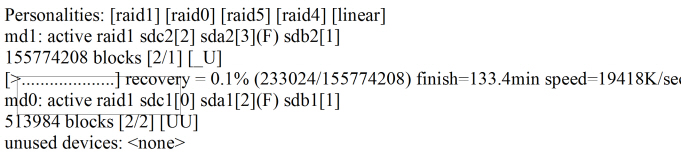
Check status of Software Raid
Measure
- Remove the two partitions
of the failing disk from the Raid configuration.
Take the following two commands, where {broken_drive} is either sda or sdb.
>mdadm --manage /dev/md0 --fail /dev/{broken_drive}1 \ --remove /dev/{broken_drive}1
>mdadm --manage /dev/md1 --fail /dev/{broken_drive}2 \ --remove /dev/{broken_drive}2
Note:If the /dev/{broken_drive}X already has been removed, the command will fail. Continue with step 2.
- It is important that the system must be shut down before the
faulty drive is physically replaced with a replacement drive, i.
e.
hot-swap
is not recommended.
The new disk should be of the same model and the same size as (or larger than) the one remaining drive (healthy one) in the system.
Reboot the system. Normally the system will boot from the healthy disk in either drive 0 (drive 1 being replaced) or drive 1 (drive 0 being replaced.
Note:If, for any reason, there is message indicating no boot disk found or there is no action shown on the monitor, reboot the system and press <F7>to enter the manual boot option in the BIOS. Choose the one to boot. Drive number is indicated ad P0 (drive 0) or P1 (drive1).
- Check which drive letter that was assigned to the disk. Check the content of /var/log/messages. (The disk could, for example, get drive letter c, to be sdc).
- Prepare the new drive to get the same partitioning as the one
in use.
>sfdisk -d /dev/{good_drive} | sfdisk /dev/{new_drive} --Linux
- Add the new disk to the RAID configuration. Note:
Adding new disk to the RAID configuration is very disc intensive activity and therefore should run at low traffic times.
>mdadm --manage /dev/md0 --add /dev/{new_drive}1
>mdadm --manage /dev/md1 --add /dev/{new_drive}2
- Wait until the new disk has been mirrored (raid synchronized)
from the operational disk.
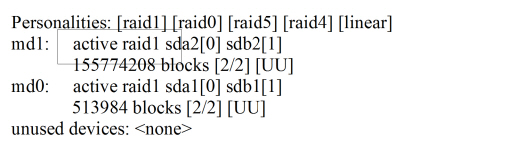
>cat /proc/mdstat
Wait until the disk is 100% synchronized.
Note:If the result is a failed spare, it is removed after a reboot of the server. Continue with step 7.
Make the new drive bootable and run the following command.
>/usr/sbin/grub2-install /dev/{new_drive}
- Enter the command alarm to erase (reset) alarms in the alarm
log.
Clear the alarms.