Managing Users
The Users page of a partner or customer admin account contains a list of all the users in that account. All users in a customer account may interact with each other using various Mitel applications after CloudLink integration is enabled on these applications.
To integrate, enable, and manage MiVoice Business features from the Mitel Administration see MiVoice Business Integration in this guide. For more information, see the Mitel Administration for MiVoice Business Solution Guide in the Mitel Document Center.
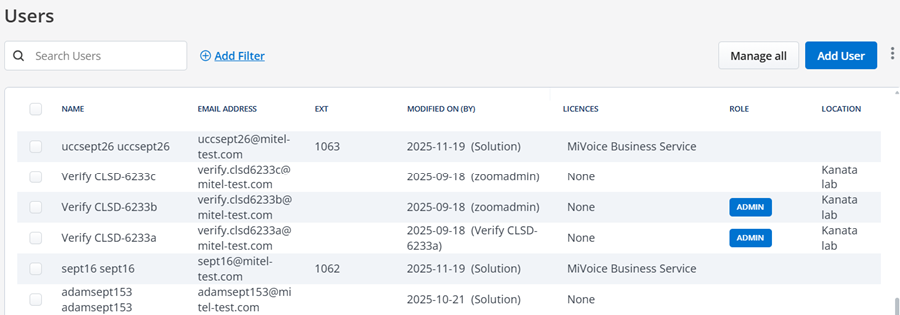
The Users page displays a list of CloudLink users along with their email addresses, extension numbers, and related details such as last modified information, licenses, roles, location and call forwarding.
- Enabled: At least one call forwarding rule is enabled.
- Disabled: Call forwarding rules exist, but all of them are disabled.
- Blank Cell: Call forwarding rules are not configured.Note: For more information about call forwarding, see the Call Forwarding Management.
You can hover over the status to view call forwarding rules, including the rule type, destination number, and enabled or disabled status.
The Users page enables Mitel Partners and Account Admins of a customer account to add, edit, view, and search for a user; enable or disable administrative rights for a user; reset a user's CloudLink password; resend CloudLink welcome email to a user; assign products and licenses to a user; and delete a user from that account.
To access the Users page of an account, do the following:
If you are logged in as a Mitel Partner:
- Click Accounts from the left navigation menu. The list of users is displayed.
- Click the User to access the account.
If you are logged in as a Customer Account Admin, follow these steps:
- From the left navigation menu, click User Management and then click Users. The list of users for this account is displayed.
- Select the preferred User to access the account.
Add User
The Customer Account Admin can add users to that account.
To add a new user, follow these steps:
- Log in to the Mitel Administration as an Account Admin.
- From the left navigation menu, click User Management, and then click Users. The Users page is
displayed.
- Click Add User. The New
User pane is displayed.

- Enter the First Name, Last Name, and Email.Note:
- The First Name, Last Name, and Email fields are mandatory, while all other fields are optional.
- Enter a valid email address for the user in the Email field. Ensure that you do not enter an email address already assigned to an existing user in the customer account.
- From the Country Code drop-down list, select the country code and enter a Mobile Number for the user.
- From the SMS
Number drop-down list, select the number for the user. You can
also click on the Search icon to search for a
number.Note: You have to enable the Twilio integration and User Numbers option to be able to assign SMS numbers to users. To perform this action, navigate to Integrations and Apps > Twilio.
- From the Role drop-down list, select the appropriate role for the
account. The available options include User, Account Admin, and
other custom roles granted by the partner. By default, the role is set to User.Note:
- If a user has the Restricted Admin role and is assigned to a Management Profile, the Role drop-down list is not displayed. In such cases, all newly created users are automatically assigned the User role by default.
- If a user has the Restricted Admin role but is not assigned to a Management Profile, the Role drop-down list is displayed. However, any custom role with higher privileges is disabled and cannot be selected, and a badge indicates that the restriction is in place.
- Unrestricted Admins can assign any custom role available to the account.
- From the Location drop-down list, select the preferred location. You can
also Search Location using Search icon.Note: To add a new location, see the Locations section.
- From the Choose a Template drop-down list, select the preferred Template. You can also Search Template using Search icon.
- Click Create. The user
account will be created, and a CloudLink welcome email will be sent to the
user’s email address.Note:
- If you selected a template, the Select a Home PBX dialog box is displayed. From the PBXs drop-down list, select the preferred PBX for user configuration. If any errors appear, select the error link to view the details, and then resolve all listed errors to proceed
- You can add users in bulk to a customer account in Mitel Administration by using the bulk import option. For more information, see the Bulk Import of Users section.
User Filtering
The user filtering system enables administrators to quickly locate and manage users based on multiple criteria. Enhanced filtering capabilities allow you to create complex queries across different user attributes, products, services, and configurations.
- Multi-criteria filtering: Combine multiple filter conditions to narrow user lists.
- Category-based organization: Filters are organized into logical categories for easy navigation.
- Real-time search: An instant search bar enables quick, text-based filtering.
- Backend and frontend processing: Query execution is optimized based on the data source.
- Permission-aware: Filter options automatically adjust based on user permissions.
- Persistent filters: Active filters remain applied while you navigate the user list.
User Role and Permission Requirements
Access to user filtering features requires appropriate permissions based on your assigned role. Filtering requires the Users permission with at least View access enabled in your role permissions. Your administrator can configure this in User Management > Roles and Permissions.
- Account Admins: Have full access to all filtering capabilities, including advanced filters for user properties, roles, products, and service configurations.
- Custom Admin Roles: May have filtering access depending on the specific Users permissions configured for the role.
Filtering Performance
Administrators may experience longer wait times when filtering large user data sets.
Filtering Users
You can filter users using one of the following options:
- Search Users: The search bar enables quick, text-based filtering to
help you find users instantly. As you type, results display in real time and
are matched across multiple user properties such as first name, last name,
email address, and username (if applicable).For example, entering “john” displays all users with “john” in their name, email, or username. The results include: John Smith ([email protected]), Johnathan Doe ([email protected]), and Sarah Johnson ([email protected]).Note: The search is case-insensitive and does not require any filter expressions, making it easy to locate users by entering any relevant text.
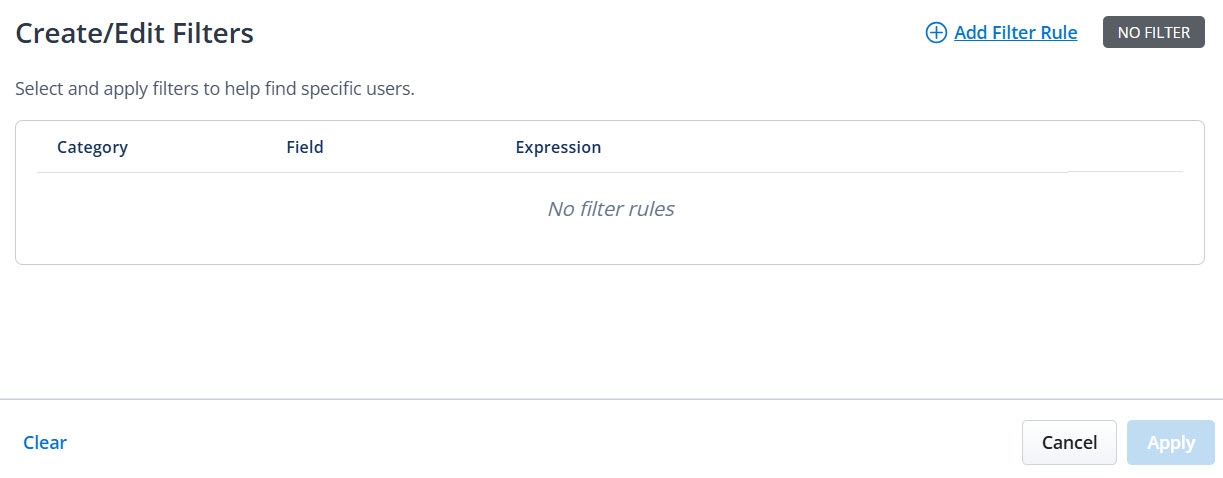
- Add Filter: Use this option for advanced filtering.
- Navigate to User Management > Users. The Users
List page is displayed.
- Click Add Filter. The Create/Edit Filters page is
displayed.
- Click Add Filter Rule. A new filter rule is enabled, allowing you to
select the category, field, and value with an expression.
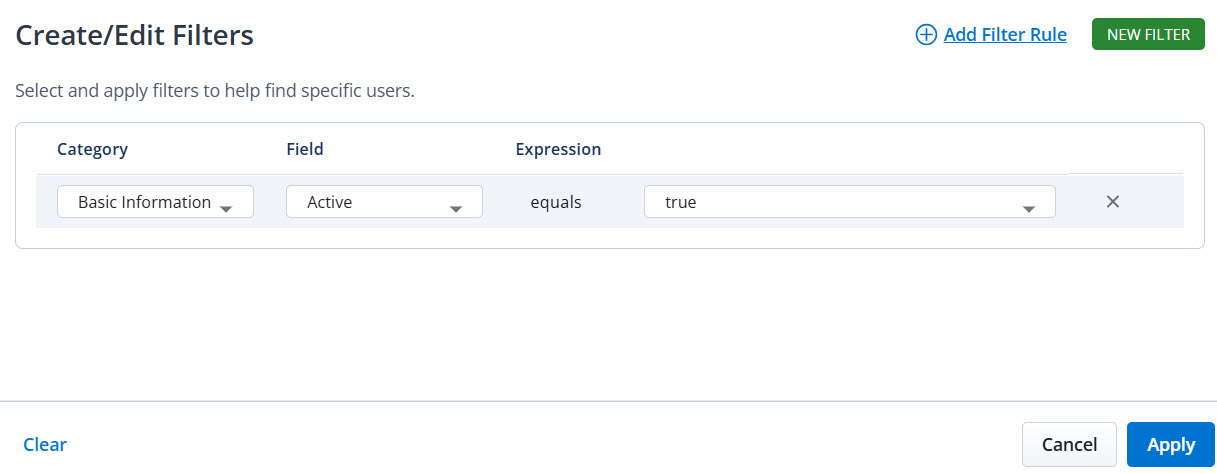
- From the Select category drop-down list, select the appropriate
category.Note: The available categories depend on your permissions and account configuration.
- From the Select field drop-down list, select the appropriate
field.Note: The available fields are displayed based on the selected category.
- From the Select value drop-down list, select the appropriate
value.Note: The available values are displayed based on the selected category and field.
- Click Apply to execute the filter. The filter page closes, and
results display on the Users List page.You can perform the following additional actions:
- To add additional filters, click Add Filter Rule again to add more criteria. Multiple filters are combined using AND logic, and all conditions must be satisfied.
- To remove a selected filter, click Remove filter.
- To remove all filters, click Clear.
- To edit or delete a configured filter, click the Edit or Delete icon on the User List page.
Add Filter Rule Options
To select and apply filters to find specific users, see the following table.Category Field Value Basic Information: Filters for user account status and source properties
Active: Find enabled or disabled user accounts
True and False
Registered: Identify users who have verified their email addresses
True and False
Source: Distinguish between app-created and PBX-imported users
Note: Source cannot be changed after user creation
- App: Users created through the CloudLink web interface or API
- PBX: Users imported from a connected PBX system
Location: Filter users by physical or organizational location
Note: Location assignments are managed separately, and users can be associated with only one location at a time
- is: Single location selection
- is one of: Multiple location selection
Roles and Permissions: Filters for user roles and access levels
Basic Role: Filter by assigned role
Note: Roles determine UI access and permissions. Each user can have only one exclusive role
- Account Admin: Administrative privileges includes Account Admin and Partner Admin
- User: Standard end user with minimal administrative rights
Products and Licenses: Filter users with specific product and license combinations
Assignments: Filter by product and license assignments
Product/License combinations. For example, MiVoice Business, Zoom PSI, and MCX
Note: Value differ based on account integrations
Service Configuration: Filters for service-specific configurations
Call Forwarding: Find users based on their call forwarding configuration status
Note: Call forwarding displays only when:- The account has MiVoice Business integration
- The call forwarding feature is enabled
- The user has permission to view call configurations
- Defined: Call forwarding is configured (enabled or disabled)
- Not Defined: Call forwarding is not configured
- Enabled: Call forwarding is configured and active
- Disabled: Call forwarding is configured
but inactive
For example, if the value is"Enabled", users with active call forwarding display
SMS Number: Find users based on SMS number assignments or specific number patterns
The SMS filter option is not available in Service Configuration when search is active
The search bar is disabled when the SMS number filter is active
Note: SMS Number displays only when:- Twilio integration is enabled
- The SMS numbers feature is configured
- The user has bulk filter permissions
- Assigned: Any SMS number is assigned to the user
- Number pattern: User-entered number
prefix (using the starts with
expression)
For example, if the value is "+1415", users with SMS numbers starting with +1415 display
Using Multiple Filters
You can apply multiple filters to narrow the user list more precisely. Click Add Filter Rule to add additional criteria. All filters are combined using AND logic, which means only users who meet every selected condition display.
Example:- Filter 1: Active = True
- Filter 2:Role = Account Admin
- Filter 3: Location = Head Office
Results display only active account admins located at the head office.Note: The filter combination rules are:- All filters must match (AND logic)
- OR logic is not supported
- The order of filters does not affect results
- Frontend filters are applied after backend filters
Filter State Indicators
On the User List page, several indicators show the filter state:- Badge number (on the Filter button): Displays the number of active filters.
- Filter chips (above the user list): Show the applied filter expressions, such as “Basic Role is User,” “Location is one of: Active equals true.”
- Search text (in the search bar): Displays the active text search terms.
- Result count (user list header): Shows the number of filtered results.
- Disabled search bar: Indicates that the SMS filter is active (search is incompatible with SMS filtering).
Note: Filters do not persist in the following scenarios:- Navigating away from the Users page
- Refreshing the browser
- Logging out and logging back in
- Closing the browser tab
Import Users
To add users in bulk to a customer account, select the customer
account > click User Management > Users. Click  and click Import Users. For more information about adding
users in bulk to a customer account, see Bulk Import of Users.
and click Import Users. For more information about adding
users in bulk to a customer account, see Bulk Import of Users.
Edit User
To edit a user’s details, click the user and update the information in the displayed form.
- You cannot edit the Name and Extension fields.
- Unrestricted Admins can assign any custom role available to the account.
- Restricted Admins assigned to a Management Profile cannot edit the Role.
- Restricted Admins who are not assigned to a Management Profile can edit the Role only if the selected user does not have higher privileges than their own. Otherwise, the field is disabled, and a badge indicates that the restriction is in place. Custom roles with higher privileges are also disabled and cannot be selected in the Role drop-down list.
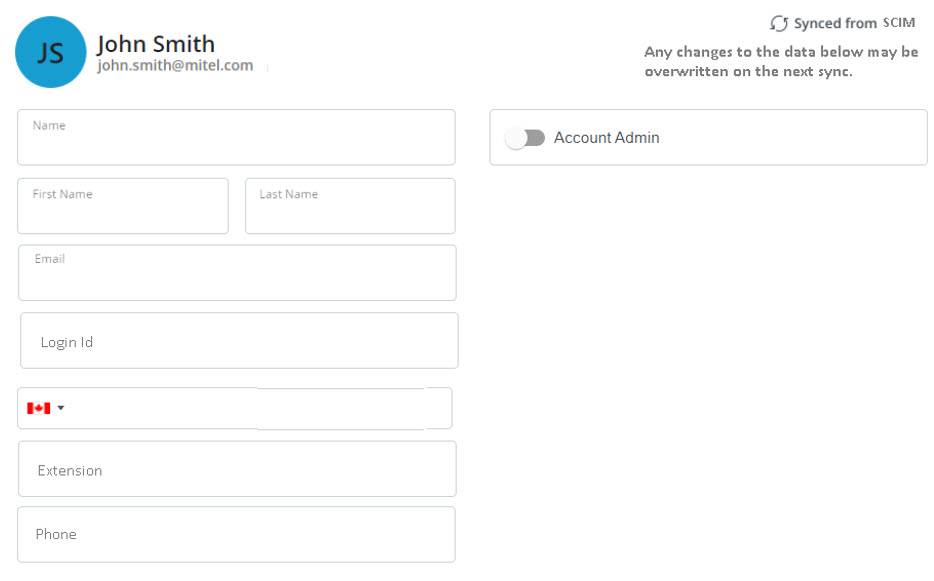
- If a user is created from an external source (such as from SCIM, PBX, or any other source except the Accounts app), some of the fields may be disabled for edit in the Accounts app. If any change is made in the source, the data may be overwritten on the next sync.
- When you add the MiVoice Business service to the user, the username field is enabled, and can be updated. If the username for the user is updated in the CloudLink account at this initial configuration of MiVoice Business service, the username entered in the Username field is synced to MiCollab and the MiVoice Business PBX. However, if the username is edited later in the CloudLink account, the updated username is not synced to MiCollab and MiVoice Business, or vice versa.
If a user is imported from SCIM, the User Edit page displays an Advance section, which contains the SCIM data for users as shown below.

Change PBX for an Existing User
You can change the Home PBX or Resilient PBX for an existing user from the User Configuration page.
- Navigate to User Management > Users.
- Select the user whose PBX you want to update.
- In the Products and licenses section, locate the MiVoice Business Service.
- Select the Settings icon to open the User Configuration page.
- Scroll to the Phones section and select the prime phone.
- In the Home PBX field:
- Select a new PBX from the list, or
- Select Not specified to allow PBX selection during template application.
- Select Save.Note: When the Home PBX is changed for the prime phone, the change cascades to all associated phones automatically.
- In the same Phones section, select the prime phone.
- In the Resilient PBX field, select the desired PBX.
- Select Save.Note: Resilient PBX settings do not cascade automatically in templates. To apply resiliency across phones, use the User Configuration interface.
Assign a User as Account Admin
- From the Users page, select the required user.
- From the Role drop-down list, select Account Admin.
- Click Save to apply the changes.
Reset CloudLink Passwords
You can reset the CloudLink password for the selected user(s) or all users, based on your preference.
- Navigate to User Management > Users. The Users page is
displayed.
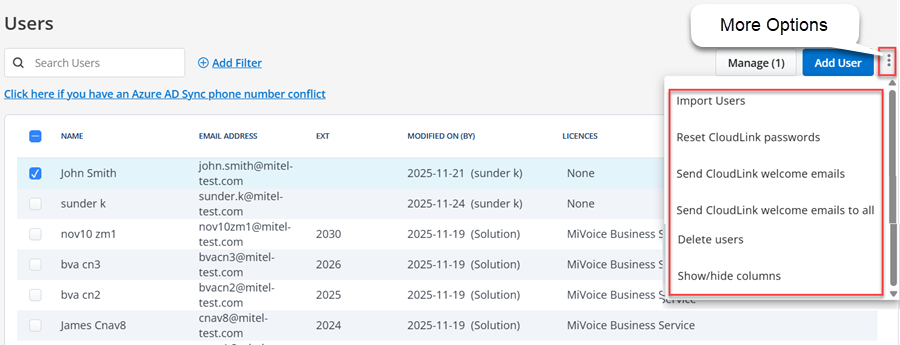
- Select the desired users whose CloudLink passwords you want to reset.
- From the More Options drop-down menu, select Reset CloudLink
Passwords. The Reset CloudLink Passwords dialog box is
displayed.Wait for some time for the action to complete. You will receive an email containing a password reset link and a confirmation code to reset the password.Note:
- If you want to reset the CloudLink password to all users, click Manage All, and then click the Reset CloudLink passwords for all link.
- The Reset CloudLink password email is sent only to users who have registered their details with Mitel and created an account.
- If SSO integration is applied to an account, the Reset CloudLink Password function is deferred to the IDP of the customer.
Send CloudLink Welcome Email
You can send the CloudLink welcome email for the selected user(s) or all users, based on your preference.
- Navigate to User Management > Users. The Users page is
displayed.
- Select the desired users to whom you want to send the CloudLink welcome email.
- From the More Options drop-down menu, select Send CloudLink
welcome emails. The Send CloudLink welcome emails dialog box
is displayed.Wait for some time for the action to complete. You will receive an email containing a Finish building your account link to setup accounts for the user.Note: If you want to send CloudLink welcome emails to all users, click Manage All, and then click the Send CloudLink welcome emails to all link.
Send MiVoice Business deployment emails
When MiVoice Business Services is applied to a user account (either automatically to existing users or when new users are created), Users for the Customer Account are sent two Welcome to MiVB emails. These are called MiVoice Business Service Deployment Emails. The Administrator determines when the emails are sent by selecting user(s) or sending emails to all users with MiVoice Business Service enabled.
- Log in to the Mitel Administration as an Account Admin.
- Click and expand User Management from the left navigation menu.
- Click Users. The Users page opens.
- Select the user(s) from the Users list. Click Manage (x).
If you are selecting specific users, the Manage (x) option will reflect the number of users chosen.

- Click Send MiVoice
Business deployment emails to send the deployment email the selected
users.

- Click Close. The
selected end user(s) are sent two Welcome to
MiVB emails with deployment and password details.Note:
- The first email contains User Portal details, Phone details and MiCollab Client details (if applicable). The second email contains passwords/phone pin.
- MiVoice Business deployment emails will not be sent to users with voicemail enabled when the Open Integration Gateway (OIG) is a Network Element in the customer deployment along with MiCollab for Mitel Administration.
- To prevent this issue, ensure that the OIG is not included in the deployment cluster for customers who use Mitel Administration for user provisioning of MiVoice Business Solutions.
Manage MiTeam Meetings License
Clicking the Manage option in the Users page of a customer account opens a panel that displays the number of MiTeam Meetings licenses available for that account and options, to assign MiTeam Meetings license to users, to unassign MiTeam Meetings license of existing users, to send CloudLink welcome emails to all users, and reset the CloudLink password of users.
- the account has MiTeam Meetings integration turned on and MiCollab integration turned off.
- the account has at least one MiTeam Meetings subscription/order assigned to it.
- the account is not a Partner Account.

- To assign MiTeam Meetings license to all the users in the customer account at once, click the Manage option, and click Assign all from the panel that opens.
- To unassign MiTeam Meetings license of all the users in the customer account at once, click the Manage option, and click Unassign all from the panel that opens.
- To assign MiTeam Meetings license to selected users, select the users from the Users page, click the Manage option, and click Assign from the panel that opens.
- To unassign MiTeam Meetings license to selected users, select the users from the Users page, click the Manage option, and click Unassign from the panel that opens.
Bulk User Settings
To assign SMS Numbers to a selected number of users in bulk do the following:
- From the Users page, select the check boxes associated with the users you want to assign SMS Numbers.
- Click Manage (x). The Manage page is displayed.
- In the Bulk
User Settings panel, click
 next to Twilio SMS
Numbers. The Assign SMS Numbers pop-up window is displayed.
next to Twilio SMS
Numbers. The Assign SMS Numbers pop-up window is displayed. - Click the Overwrite SMS numbers for selected users drop down menu and
select Assign all.
If you want to unassign all SMS numbers to the selected users, click Unassign all.
- Click Save.
If the number of users is more than the available SMS numbers, then an error message is displayed and the Assign all option is not available.
Delete User
To delete an active or inactive user(s), perform these steps:
- Select the check box associated with the user(s) whom you want to delete,
and click the icon.
- From the panel that opens, click Delete users. Delete Selected User(s)? dialog box is displayed.
- Type the word delete, and click Delete.
- Select the user from the Users page and scroll down to the bottom of the page.
- Click Delete. Delete User dialog box is displayed.
- Type the word delete, and click Delete. The user will be deleted.
- You cannot delete a Mitel Partner, or a user synced from MiCloud Connect.
- Deleting a user synced from a PBX will only remove the CloudLink account of the user and will not delete the user from the PBX. After deletion, the user will continue to be listed in the Users page of Mitel Administration. To add a CloudLink account to the user again, the Account Admin must send a CloudLink welcome email to the user.
- Deleting the SCIM users synced from Azure Active Directory will only remove the CloudLink account of the user and will not delete the user from Azure Active Directory.
Show or Hide Columns in the Users Page
You can customize the columns displayed in the Users page to suit your workflow. This includes the Contact Center column and other user-related fields such as email address, extension, role, and license status.
To show or hide columns:
- Navigate to User Management > Users.
- Click the three vertical dots in the top right corner.
- Select Show/hide columns from the options menu.
- In the Show/hide columns pop-up, do one of the following:
- Select or clear the check boxes for the columns you want to display or hide.
- To display the Contact Center column, select the Contact
Center (Mitel CX specific) checkbox.Note: The Contact Center column is available to Partner Admins, Customer Admins, and users listed in Mitel CX.
- Select OK to apply the changes.