Configuring your CloudLink platform with Microsoft Azure Active Directory (Azure AD) allows users on your account to access CloudLink applications using their enterprise credentials.
Prerequisites
To configure Azure AD integration with CloudLink platform, you must have:
- An Azure AD subscription
If you do not have an Azure AD environment, you can get a free account.
- A Mitel CloudLink account
Adding Mitel Connect from the Gallery
To configure Azure AD integration with CloudLink platform, you must add the Mitel Connect application from the gallery to your list of managed SaaS apps in the Azure portal.
To add Mitel Connect from the gallery:
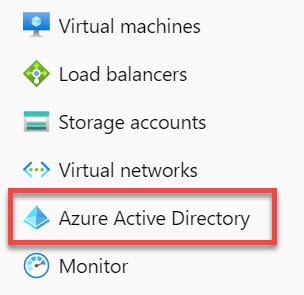
- In the Azure portal, on the left navigation panel, click Azure Active Directory. The Azure Active Directory panel opens.
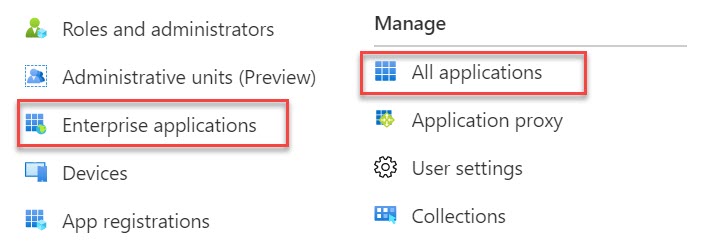
- In the Azure Active Directory panel, select Enterprise applications. The All applications page opens and displays a list of applications in your Azure AD tenant.
- Click New application. The Add an application page opens.

- In the Add from the gallery section, type Mitel Connect in the Enter a name field. Click the Mitel Connect application from the results panel, and then click Add from the application information panel that opens.

Configure and Test Azure AD Single Sign-On
This section describes how to configure and test Azure AD single sign-on with CloudLink platform based on a test user named John Smith. For single sign-on to work, a link must be established between the user in the Azure AD portal and the corresponding user in the CloudLink platform.
To configure and test Azure AD single sign-on with CloudLink platform, complete the following steps:
- Configure CloudLink platform for Single Sign-On with Azure AD —to enable your users to use this feature and to configure the SSO settings on the application side.
- Create an Azure AD Test User —to test Azure AD single sign-on with John Smith.
- Assign the Azure AD Test User —to enable John Smith to use Azure AD single sign-on.
- Create a CloudLink Test User —to create a user for John Smith in the Mitel Administration that is linked to the corresponding user in the Azure AD portal.
- Test Single Sign-On —to verify that the configuration works.
Configure CloudLink platform for Single Sign-On with Azure AD
This section describes how to enable Azure AD single sign-on for CloudLink platform in the Azure portal and how to configure your CloudLink platform account to allow SSO using Azure AD.
To configure CloudLink platform with SSO for Azure AD, it is recommended that you open the Azure portal and the Mitel Administration side-by-side as you will need to copy some information from the Azure portal to the Mitel Administration and vice versa.
- 1. To access the Basic SAML Configuration page in the Azure portal, do the following:
- Navigate to Azure Active Directory > Enterprise applications, and select Mitel Connect from the list. The Mitel Connect Overview page opens.
- Under the Manage section, select Single sign-on.

- In the Select a Single sign-on method page that opens, click SAML.
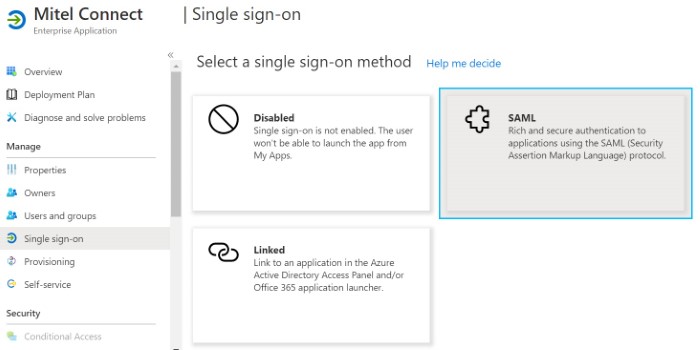
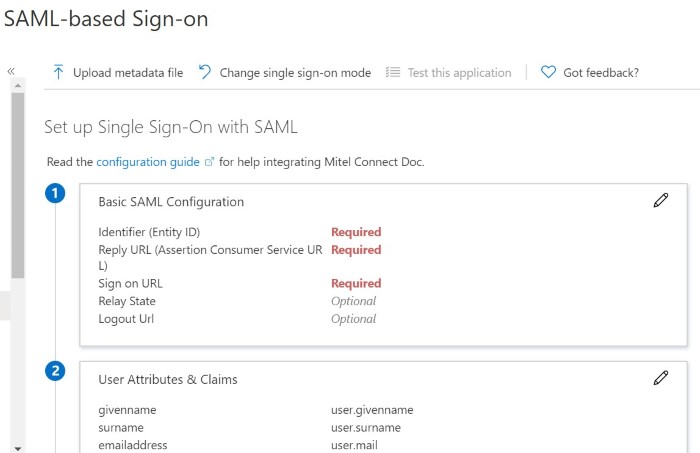
The SAML-based Sign-on page opens, displaying the Basic SAML Configuration section.
- To access the Single Sign-On configuration dialog box in the Mitel Administration, you must do the following:
- Navigate to the Account Information page of the customer account with which you want to enable the integration.
- In the Integrations section, click + Add new. A pop-up screen displays the Integrations panel.
- Click the 3rd party tab. A list of supported third-party applications is displayed. Click the Add button associated with Single Sign-On, and click Done.

The Single Sign-On is enabled for the customer account and is added to the Integrations section of the Account Information page.
- Click Complete setup.

The Single Sign-On configuration dialog box opens.
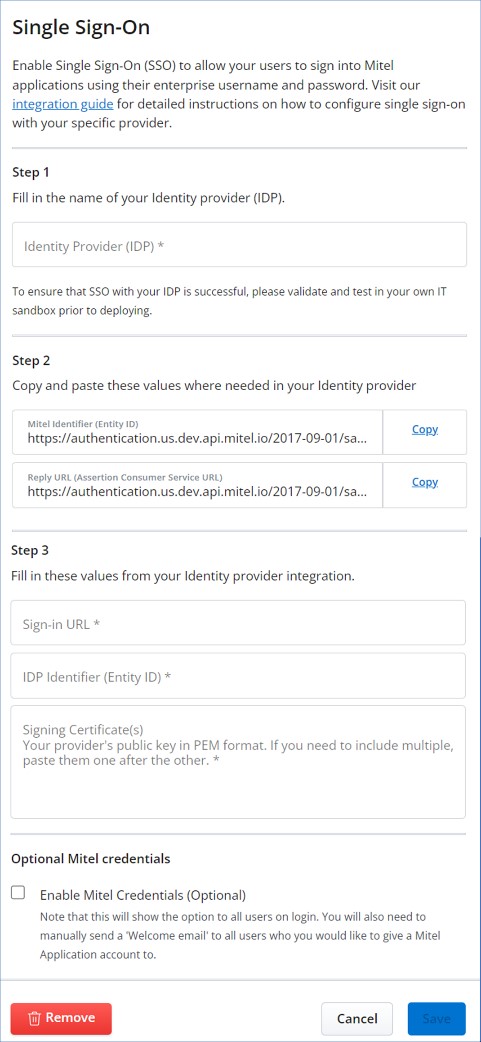 Note:
Note:All users even SSO only users are required to complete the welcome email process.
Mitel recommends that the Enable Mitel Credentials (Optional) check box in the Optional Mitel credentials section is not selected. Select this check box only if you want the user to log in to the CloudLink application using the Mitel credentials in addition to the single sign-on option.
If a CloudLink User is set as Admin in the CloudLink Portal they will always be offered the option to sign in using the Mitel credentials in addition to the single sign-on option.
- In the Azure portal, from the SAML-based Sign-on page, click the Edit icon (
 ) in the Basic SAML Configuration section. The Basic SAML Configuration panel opens.

- Copy the URL from the Mitel Identifier (Entity ID) field in the Mitel Administration and paste it into the Identifier (Entity ID) field in the Azure portal.
- Copy the URL from the Reply URL (Assertion Consumer Service URL) field in the Mitel Administration and paste it into the Reply URL (Assertion Consumer Service URL) field in the Azure portal.
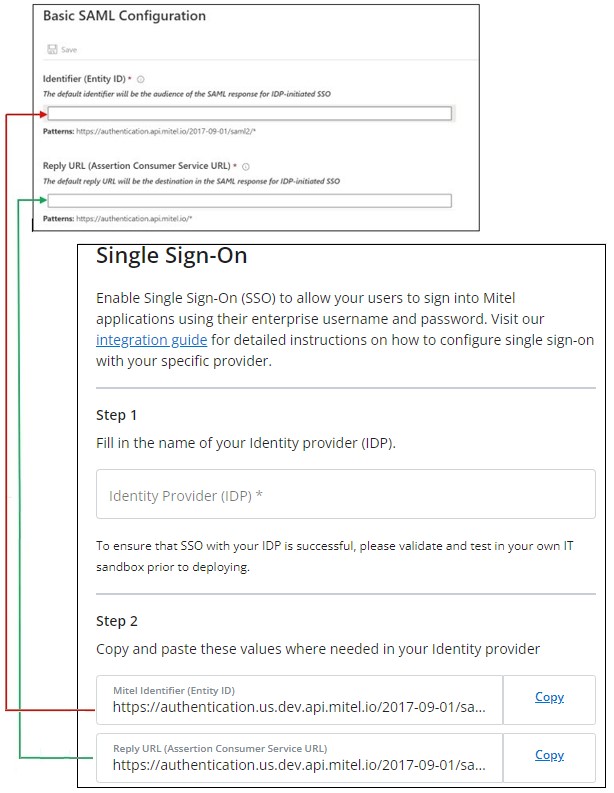
- In the Sign on URL text box, type the following URL:
https://accounts.mitel.io - to use the Mitel Administration as your default Mitel application.
 Note: The default Mitel application is the application accessed when a user clicks the Mitel Connect tile in the Access Panel. This is also the application accessed when performing a test setup from Azure AD.
 - Click
 in the Basic SAML Configuration panel.
 - In the SAML Signing Certificate section on the SAML-based sign-on page in the Azure portal, click Download beside Certificate (Base64) to download the Signing Certificate. Save the certificate on your computer.
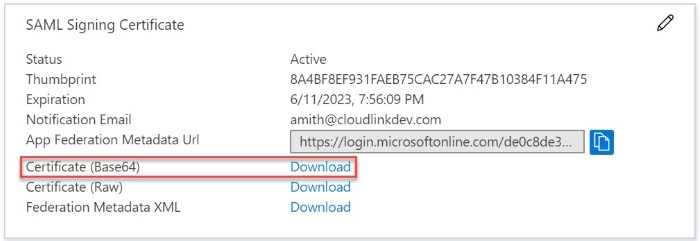
- Open the Signing Certificate file in a text editor, copy all data in the file, and then paste the data into the Signing Certificate field in the Mitel Administration.
Note: If you have more than one certificate, it is recommended that you paste them one after the other.

- In the Set up Mitel Connect section on the SAML-based sign-on page of the Azure portal, do the following:
- Copy the URL from the Login URL field and paste it into the Sign-in URL field in the Mitel Administration.
- Copy the URL from the Azure AD Identifier field and paste it into the IDP Identifier (Entity ID) field in the Mitel Administration.

- Click Save on the Single Sign-On panel in the Mitel Administration.
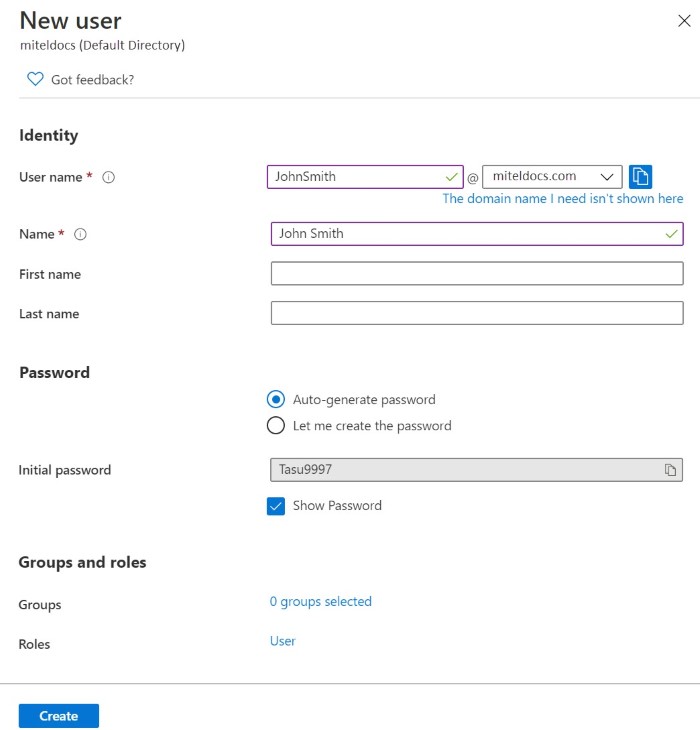
Create an Azure AD Test User
This section describes how to create a test user named John Smith in the Azure portal.
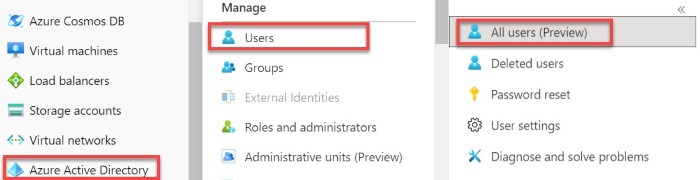
- In the Azure portal, from the left pane, navigate to Azure Active Directory > Users > All users.
- Click New user at the top of the screen.

- In the New user details page that opens, enter the following details:
- In the User name field, type JohnSmith@<yourcompanydomain>.<extension>.
For example: [email protected]
- In the Name field, type John Smith.
- Select the Show Password check box, and then write down the auto-generated password that is displayed in the Initial password box. You can also choose to create your own password by selecting the Let me create the password check box.
Note: This is the password a user must provide to log in to the Azure portal for the first time.
- Click Create.
- In the User name field, type JohnSmith@<yourcompanydomain>.<extension>.
Assign the Azure AD Test User
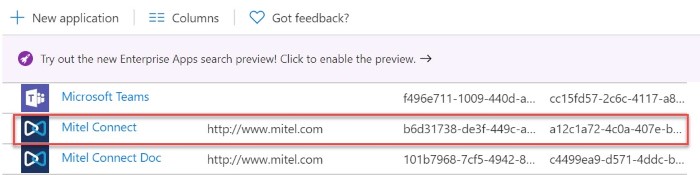
This section describes how to enable John Smith to use Azure single sign-on by granting access to Mitel Connect.
- In the Azure Active Directory panel, select Enterprise applications. The All applications page opens, displaying a list of applications in your Azure AD tenant.
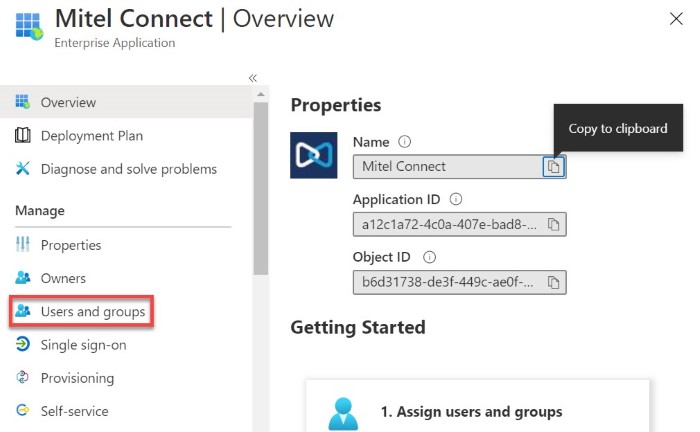
- In the applications list, click Mitel Connect. The Mitel Connect Overview page appears.
- In the menu that appears, click Users and groups. The Users and groups page opens.
- Click Add user and then click Users and groups in the Add Assignment page that opens.
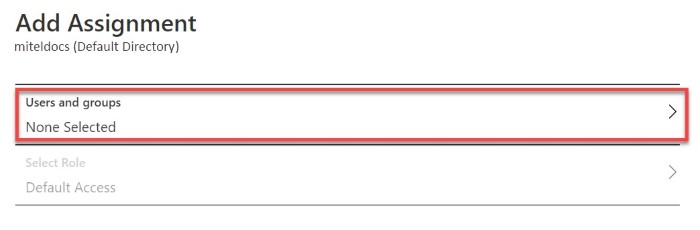
- In the Users and groups page that opens, select John Smith in the Users list and then click Select at the bottom of the screen.

- By default, the role of a new user is Default Access. If you are expecting any role value in the SAML assertion, select the appropriate role for the user from the list in the Select Role page, and then click Select at the bottom of the screen.
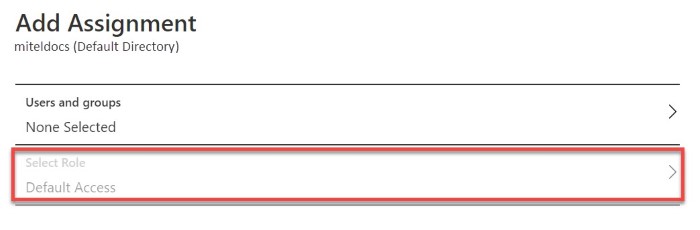
- In the Add Assignment page, click Assign.

Create a CloudLink Test User
This section describes how to create a test user named John Smith on your CloudLink platform. Users must be created and activated before they can use single sign-on.
For details about adding users in the Mitel Administration, see the Managing Users topic in Mitel Administration documentation.
- Name: John Smith
- First Name: John
- Last Name: Smith
- Email: [email protected]
Note: The user's CloudLink email address must be identical to the User Principal Name in Azure AD portal.
Test Single Sign-On
In this section, you will test your Azure AD single sign-on configuration using the Access Panel.
When you click the Mitel Connect tile in the Access Panel, you should be automatically redirected to sign in to the CloudLink application you configured as your default in the Sign on URL field. For more information about the Access Panel, see Introduction to the Access Panel.
Renewing a SAML Signing Certificate in Azure:
Renewing the SAML Signing Certificate updates the digital certificate used for secure communication inSingle Sign-On (SSO) setups, ensuring continued security and validity.
-
Navigate to the Existing Single Sign-On Setup:
- In Azure, under Enterprise applications > SSO application, click Set up single sign on > Get started.

-
Edit SAML Certificates:
- In the SAML Certificates window, click Edit.
-
Renew Certificate:
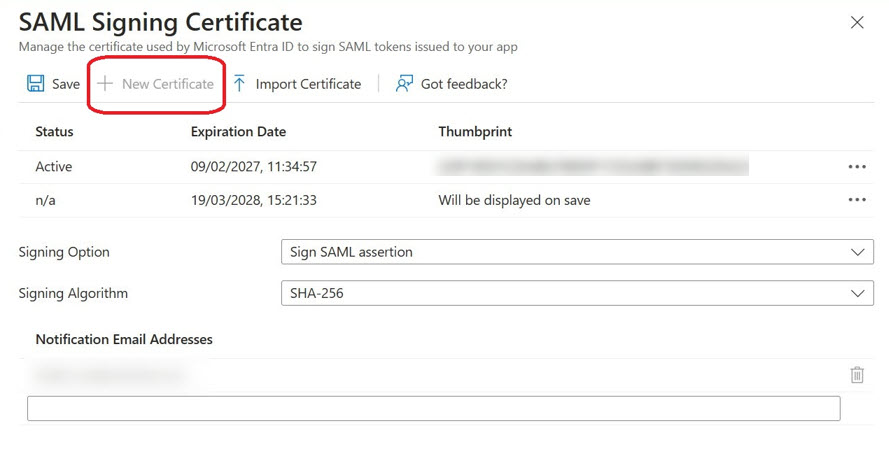
- In the SAML Signing Certificate window, click New Certificate.
- Click Save.
This ensures that a new certificate is generated and saved, which is crucial for maintaining secure communication in your SSO setup.
-
Download the Signing Certificate:
-
In the SAML Signing Certificate section on the SAML-based sign-on page in the Azure portal, click Download beside Certificate (Base64) to download the Signing Certificate.
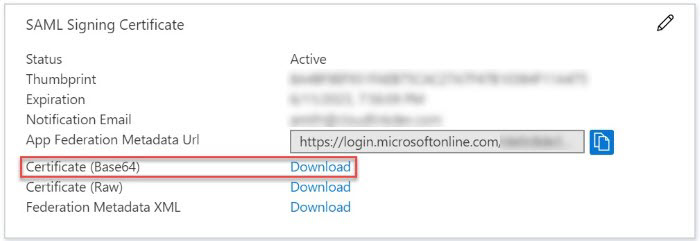
- Save the certificate on your computer.
-
-
Update the Signing Certificate to Mitel Administration:
-
Navigate to Mitel Administration and Click the settings (Cog) against the Single Sign-On integration.

- Open the Signing Certificate file in a text editor.
- Copy all data in the file.

- Delete the existing contents in the Signing Certificate(s) field.
- Paste the new data into the Signing Certificate(s) field.Note: If you have more than one certificate, paste them one after the other.
- Click Save.
The certificate is now renewed.
-