Configure MiVoice Office 400 on SMBC Platform
This topic explains how to configure a MiVoice Office 400 PBX on an SMBC platform (with embedded Gateway) to integrate with CloudLink. For detailed PBX instructions, see the MiVoice Office 400 technical documentation.
Use the instructions in the sections below in this specific order to ensure that your MiVoice Office 400 is correctly integrated with CloudLink. Leave all other settings (not specifically mentioned in these sections) set to the default value.
- Add CloudLink App Users
- Install Mitel CloudLink Gateway Application
- Access Application Configuration Link
- Onboard Customers
- Verify CloudLink SMBC
- Verify CSTA Service
- Verify SIP Networking
- Verify Mitel CloudLink Gateway Service
- Configure GSM Call Through Feature
Add CloudLink App Users
The MiVoice Office 400 PBX needs to be programmed to add all of the users who will be able to access CloudLink applications like the Mitel One application.
- Navigate to Configuration > Users
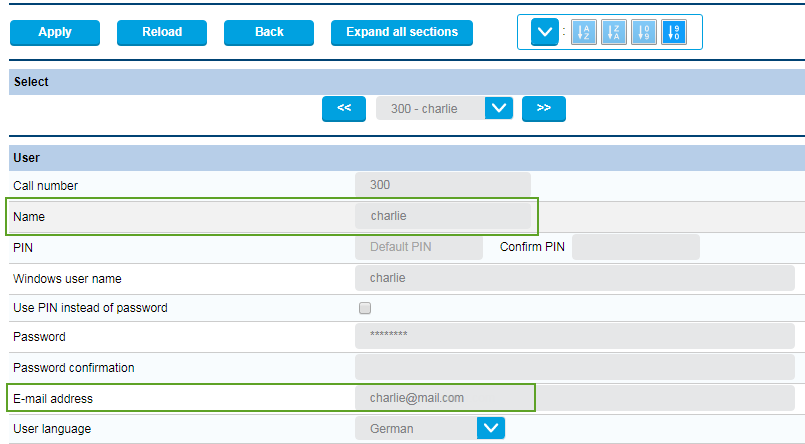
- Enter the following required information for each user of the Mitel One application:
- Name
- E-mail address
- Click Apply. Users will be propagated through push notifications to the CloudLink Platform.
To log in to the Mitel One application, a user must have a valid:
- MiVoice 400 Software Assurance (SWA) license from Mitel
- MiVoice Office softphone terminal license in the MiVoice 400 PBX.
If the user does not have these two licenses or if these licenses have expired, a No License Available alert appears when the user attempts to log in to the Mitel One application and the user will not be able to log in. The user must then obtain new licenses or renew the existing licenses to continue using the Mitel One application.
- Navigate to Configuration > Users.
- Enter the new email of the user in the E-mail address field.
- Click Apply to save the changes.
- Sync the MiVO 400 PBX with the CloudLink Gateway for the changes to reflect in the CloudLink Platform.
Install Mitel CloudLink Gateway Application
Install the Mitel CloudLink Gateway application software using the SMB Controller Manager admin console. The MiVO400 technical documentation provides detailed instructions for installing application files and configuring associated LED indicators in the SMB Controller Manager.
After this software is installed, you will see Mitel CloudLink Gateway (Application configuration) listed under Currently Installed applications in the SMB Controller Manager.

Access Application Configuration Link
To properly complete the customer onboarding, the first time the CloudLink Gateway Portal is accessed, it must be accessed from the SMB Controller Manager.
Navigate to Software > Applications and click the Application configuration link shown in the image above. After customer onboarding is completed, the CloudLink Gateway Portal can be accessed several different ways. For details, see Access the CloudLink Gateway.
Onboard Customer
The next step of the integration process is to complete the Onboard Customers steps. When onboarding is completed, updates to the MiVO400 are completed automatically. Return to this page to continue with the next section below.
Verify CloudLink SMBC/VA Account
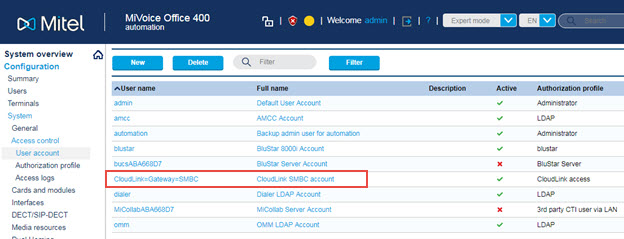
A user name is automatically created and configured as part of the Mitel CloudLink Gateway application installation. To verify that a user name was set to CloudLink=Gateway=SMBC (CloudLink=Gateway for VA platform) as shown below, navigate to Configuration > System > Access control > User account.
Verify CSTA Service
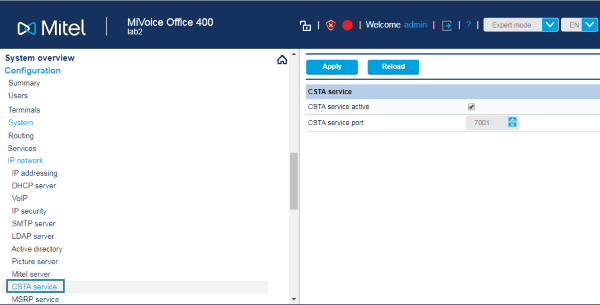
The CSTA (computer-supported telecommunications applications) service is automatically enabled and set to port 7001 by default. To verify this, navigate to Configuration > IP network > CSTA service and ensure the check box is selected next to CSTA service active as shown below.
Verify SIP Networking
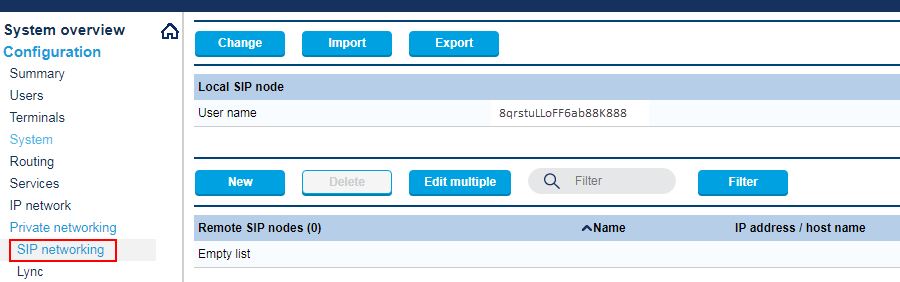
For SIP networking, a Local SIP node user is automatically created. To verify this, navigate to Configuration > Private networking > SIP networking and ensure that a user name was created under Local SIP node as shown below.
Verify Mitel CloudLink Gateway Service
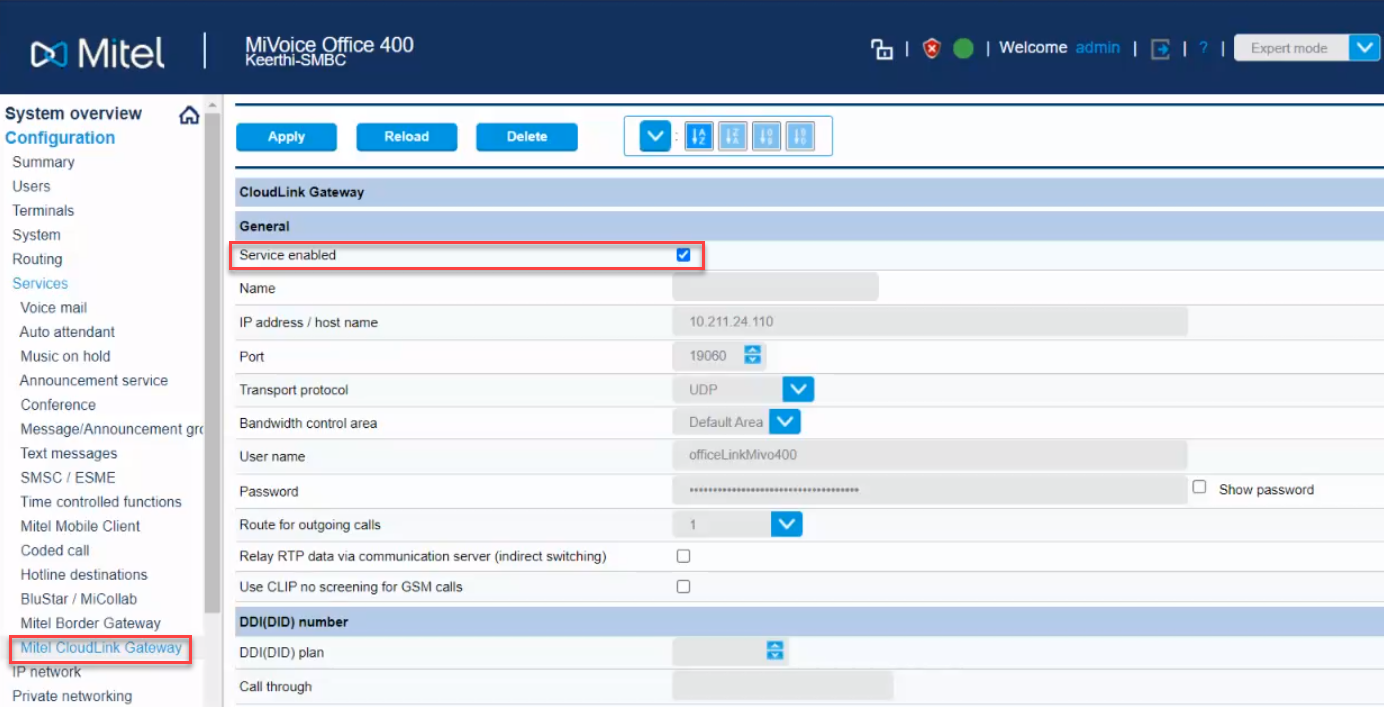
To verify service, navigate to Configuration > Services > Mitel CloudLink Gateway and ensure that the check box next to the Service enabled field is selected as shown below.
Configure GSM Call Through Feature
The MiVoice Office 400 PBX needs to be configured as explained below to support the GSM "Call through" feature for your CloudLink applications.
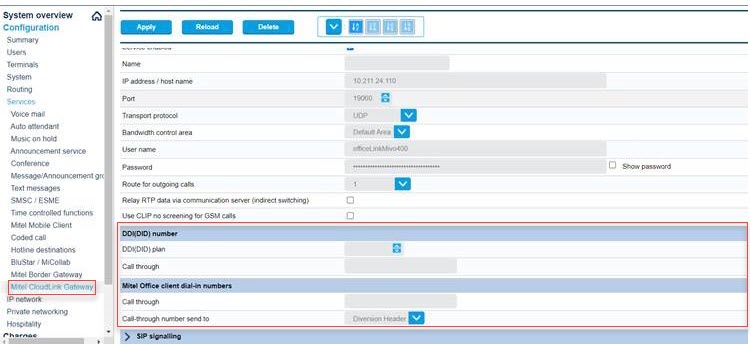
- Navigate to Configuration > Services > Mitel CloudLink Gateway.
- Under the DDI (DID) number heading, select the used DDI (DID) plan and an unused DDI in Call through number.
- Under the Mitel Office client dial-in numbers heading, set the full dialable Call through number.
Note: The Call through number under the Mitel Office client dial-in numbers heading must be configured in the E.164 format.
- To verify the DDI (DID) number that was created above, navigate to Configuration > Routing > Graphical view to confirm that the correct number appears under the DDI (DID) plan heading shown below.

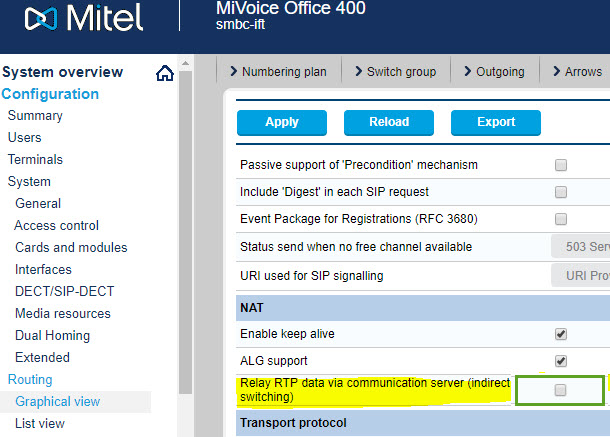
- The Relay RTP data via communication server (indirect switching) setting is disabled by default (not selected). If this setting is enabled for any reason, incoming GSM calls will not be received. To prevent or resolve this issue, navigate to Configuration > Routing > List View > Network Interfaces and in the NAT section of the interface, ensure that the Relay RTP data via communication server (indirect switching) check box is not selected.
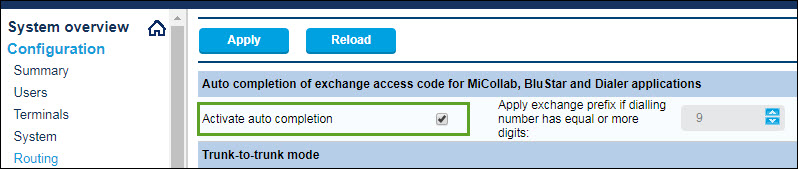
- To enable placing a call without adding the external prefix, you must select the Activate auto completion option and enter the number of digits valid for your configuration. To do this, navigate to Configuration > Routing > Exchange > General and select the Activate auto completion check box in the Auto completion of exchange access code... section.