The integration of MS Teams presence has been expanded to enable the synchronization of Microsoft Teams presence of a user with the MiCollab client through CloudLink, and this is known as Bi-directional presence synchronization. To achieve this presence synchronization from Microsoft Teams to MiCollab via CloudLink, follow the procedure below.
Bi-directional presence synchronization can be enabled for new users and existing users, for whom the Unidirectional presence is already enabled.
Prerequisites
-
Gateway integration enabled for MiVoice Business. See the CloudLink Integration with MiVoice Business Deployment Guide for more details.
-
The MiCollab version 9.8 SP1 or above with the Microsoft Teams Integration enabled.
Note:When enabling integrations that require MiCollab, such as Microsoft Teams Bi-Directional, it is mandatory to populate the MiCollab IP Address or FQDN and MiCollab Password in the CloudLink Gateway Configuration.
The FQDN must resolve to the IP address of MiCollab's LAN interface.
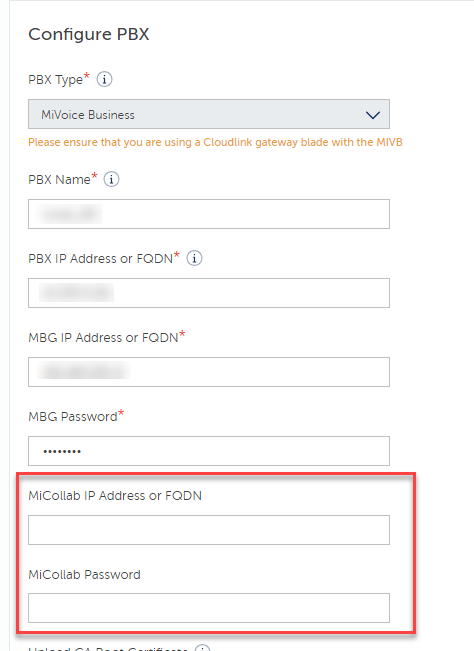 Note: The Microsoft Teams to CloudLink presence is only supported on MiVoice Business.
Dependencies
To set up the presence integration with Microsoft Teams, administrative-level access is required for the following:
-
Microsoft Azure Active Directory (AD) with Microsoft Office 365 Global admin access
-
Customer or Partner Admin Access to the Customer CloudLink Account
Integrating Microsoft Teams with a Customer Account (new customer)
To integrate Microsoft Teams with a customer account involves two separate procedures:
-
Configuring the feature requirements in Azure (as Azure Administrator) involves:
-
App registration in Azure portal
-
Configuring API permissions
-
Creating Presence Monitor user(s)
-
-
Configuring the presence feature in Mitel Administration (as CloudLink Administrator)
Configuring feature requirements in Azure for new customers
Setting up Azure configuration for a new customer involves several steps, including the registration of a new Azure application, configuration of secrets, defining redirect URIs, specifying API permissions, and the creation of new presence monitor users. The configuration steps for a new customer are outlined below.
App registration in the Azure portal
The registration of the Azure application is carried out to establish the presence synchronization from CloudLink to Microsoft Teams.
-
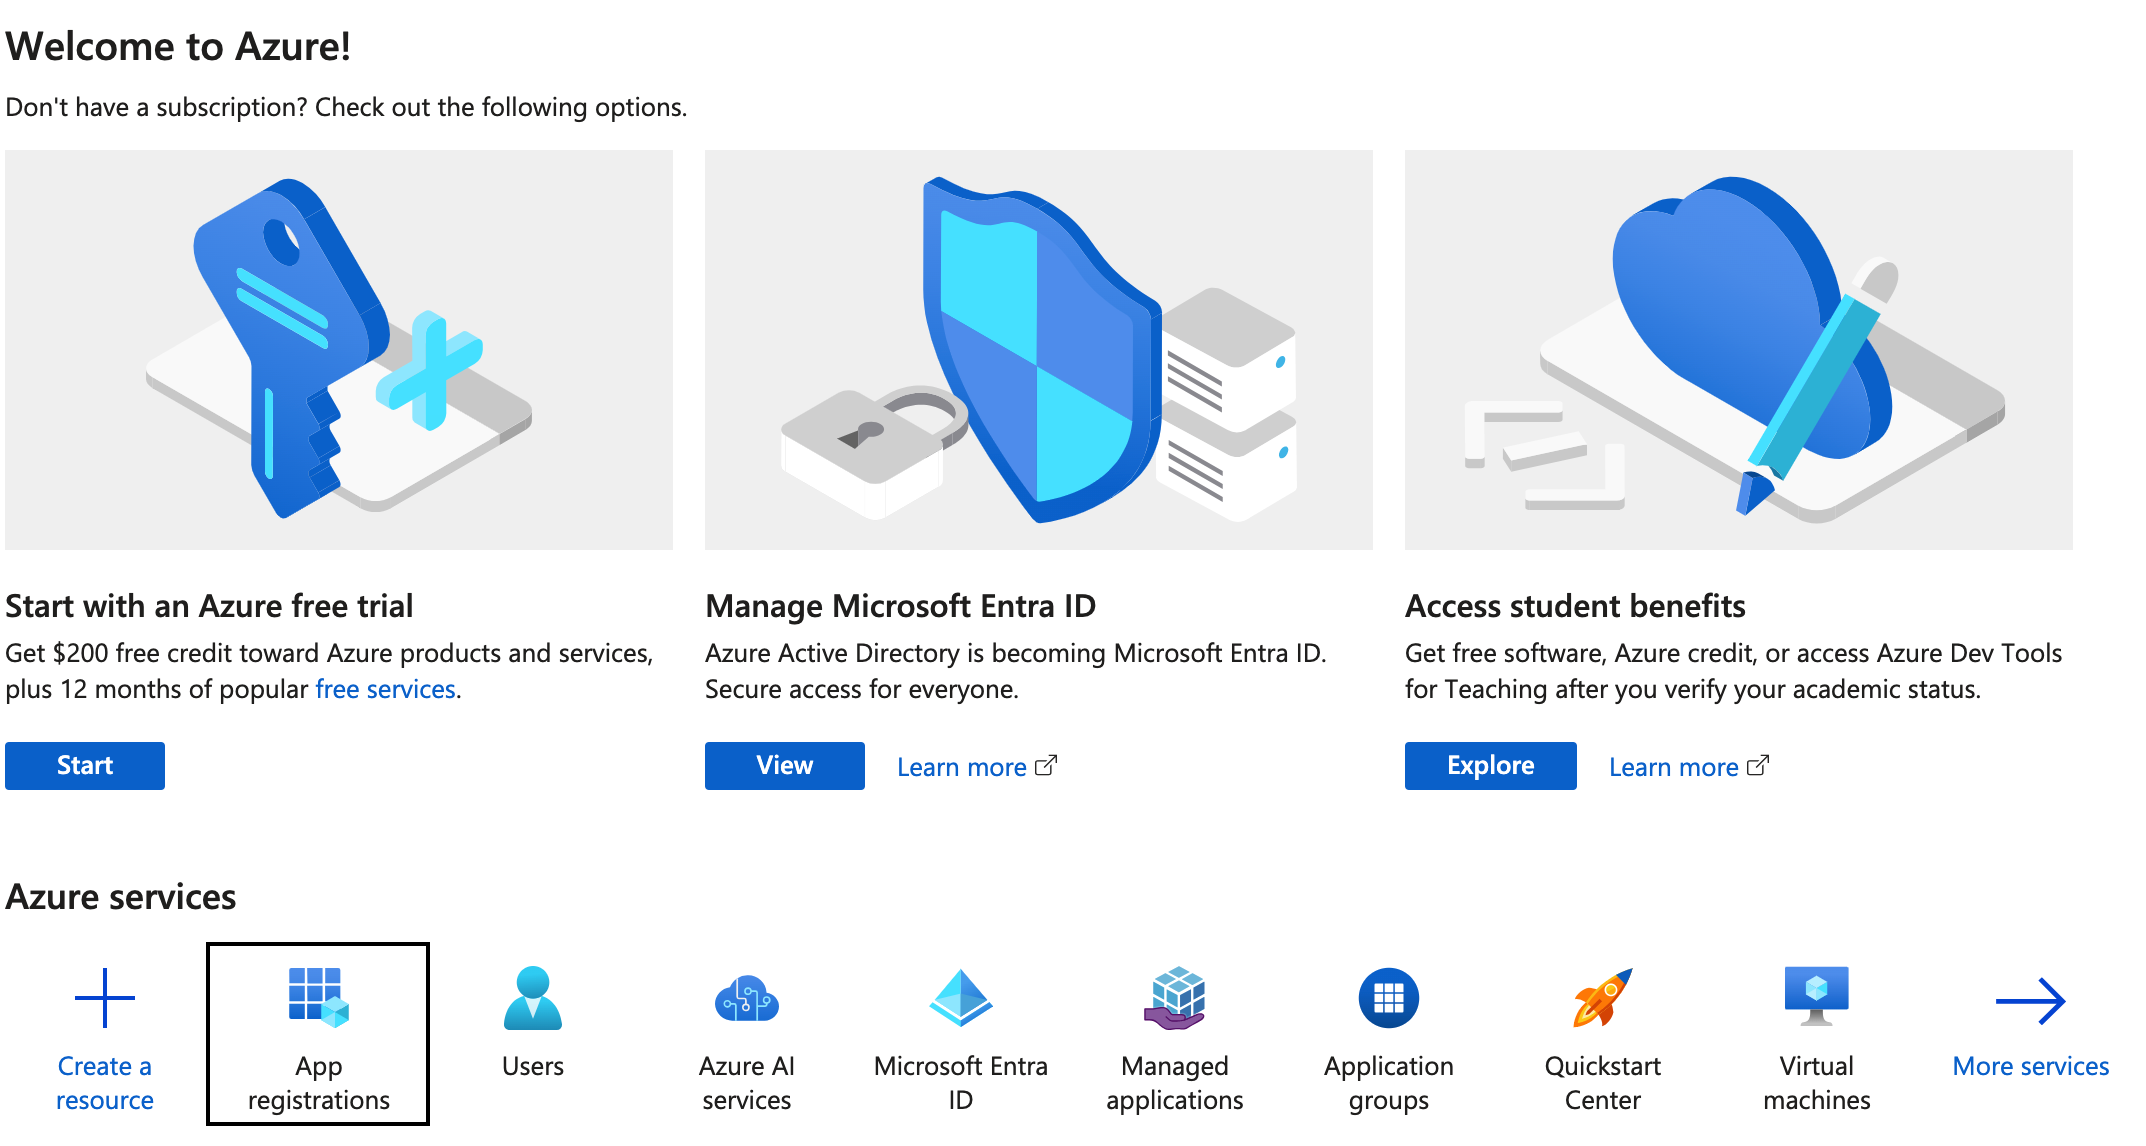
In the Azure Portal, click App registrations.
-
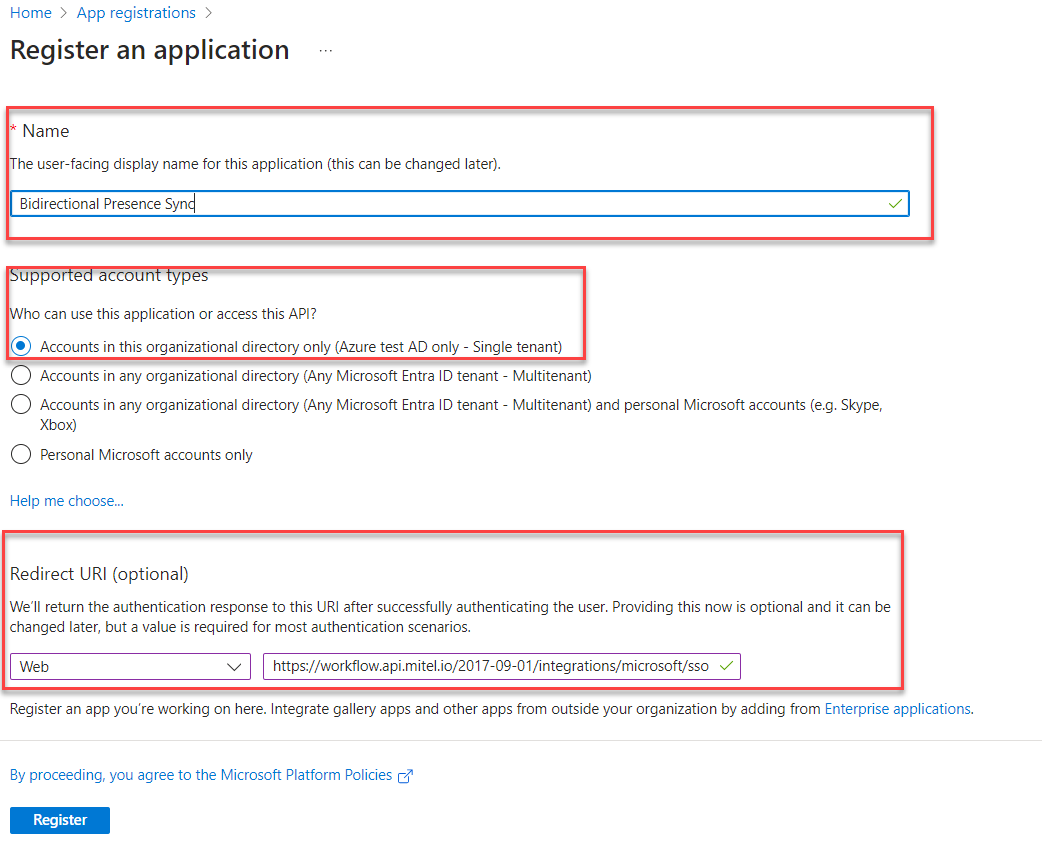
In the App registrations page, click + New Registration.
-
In the Register an application page, enter a desired Name and keep the default Supported account type.
-
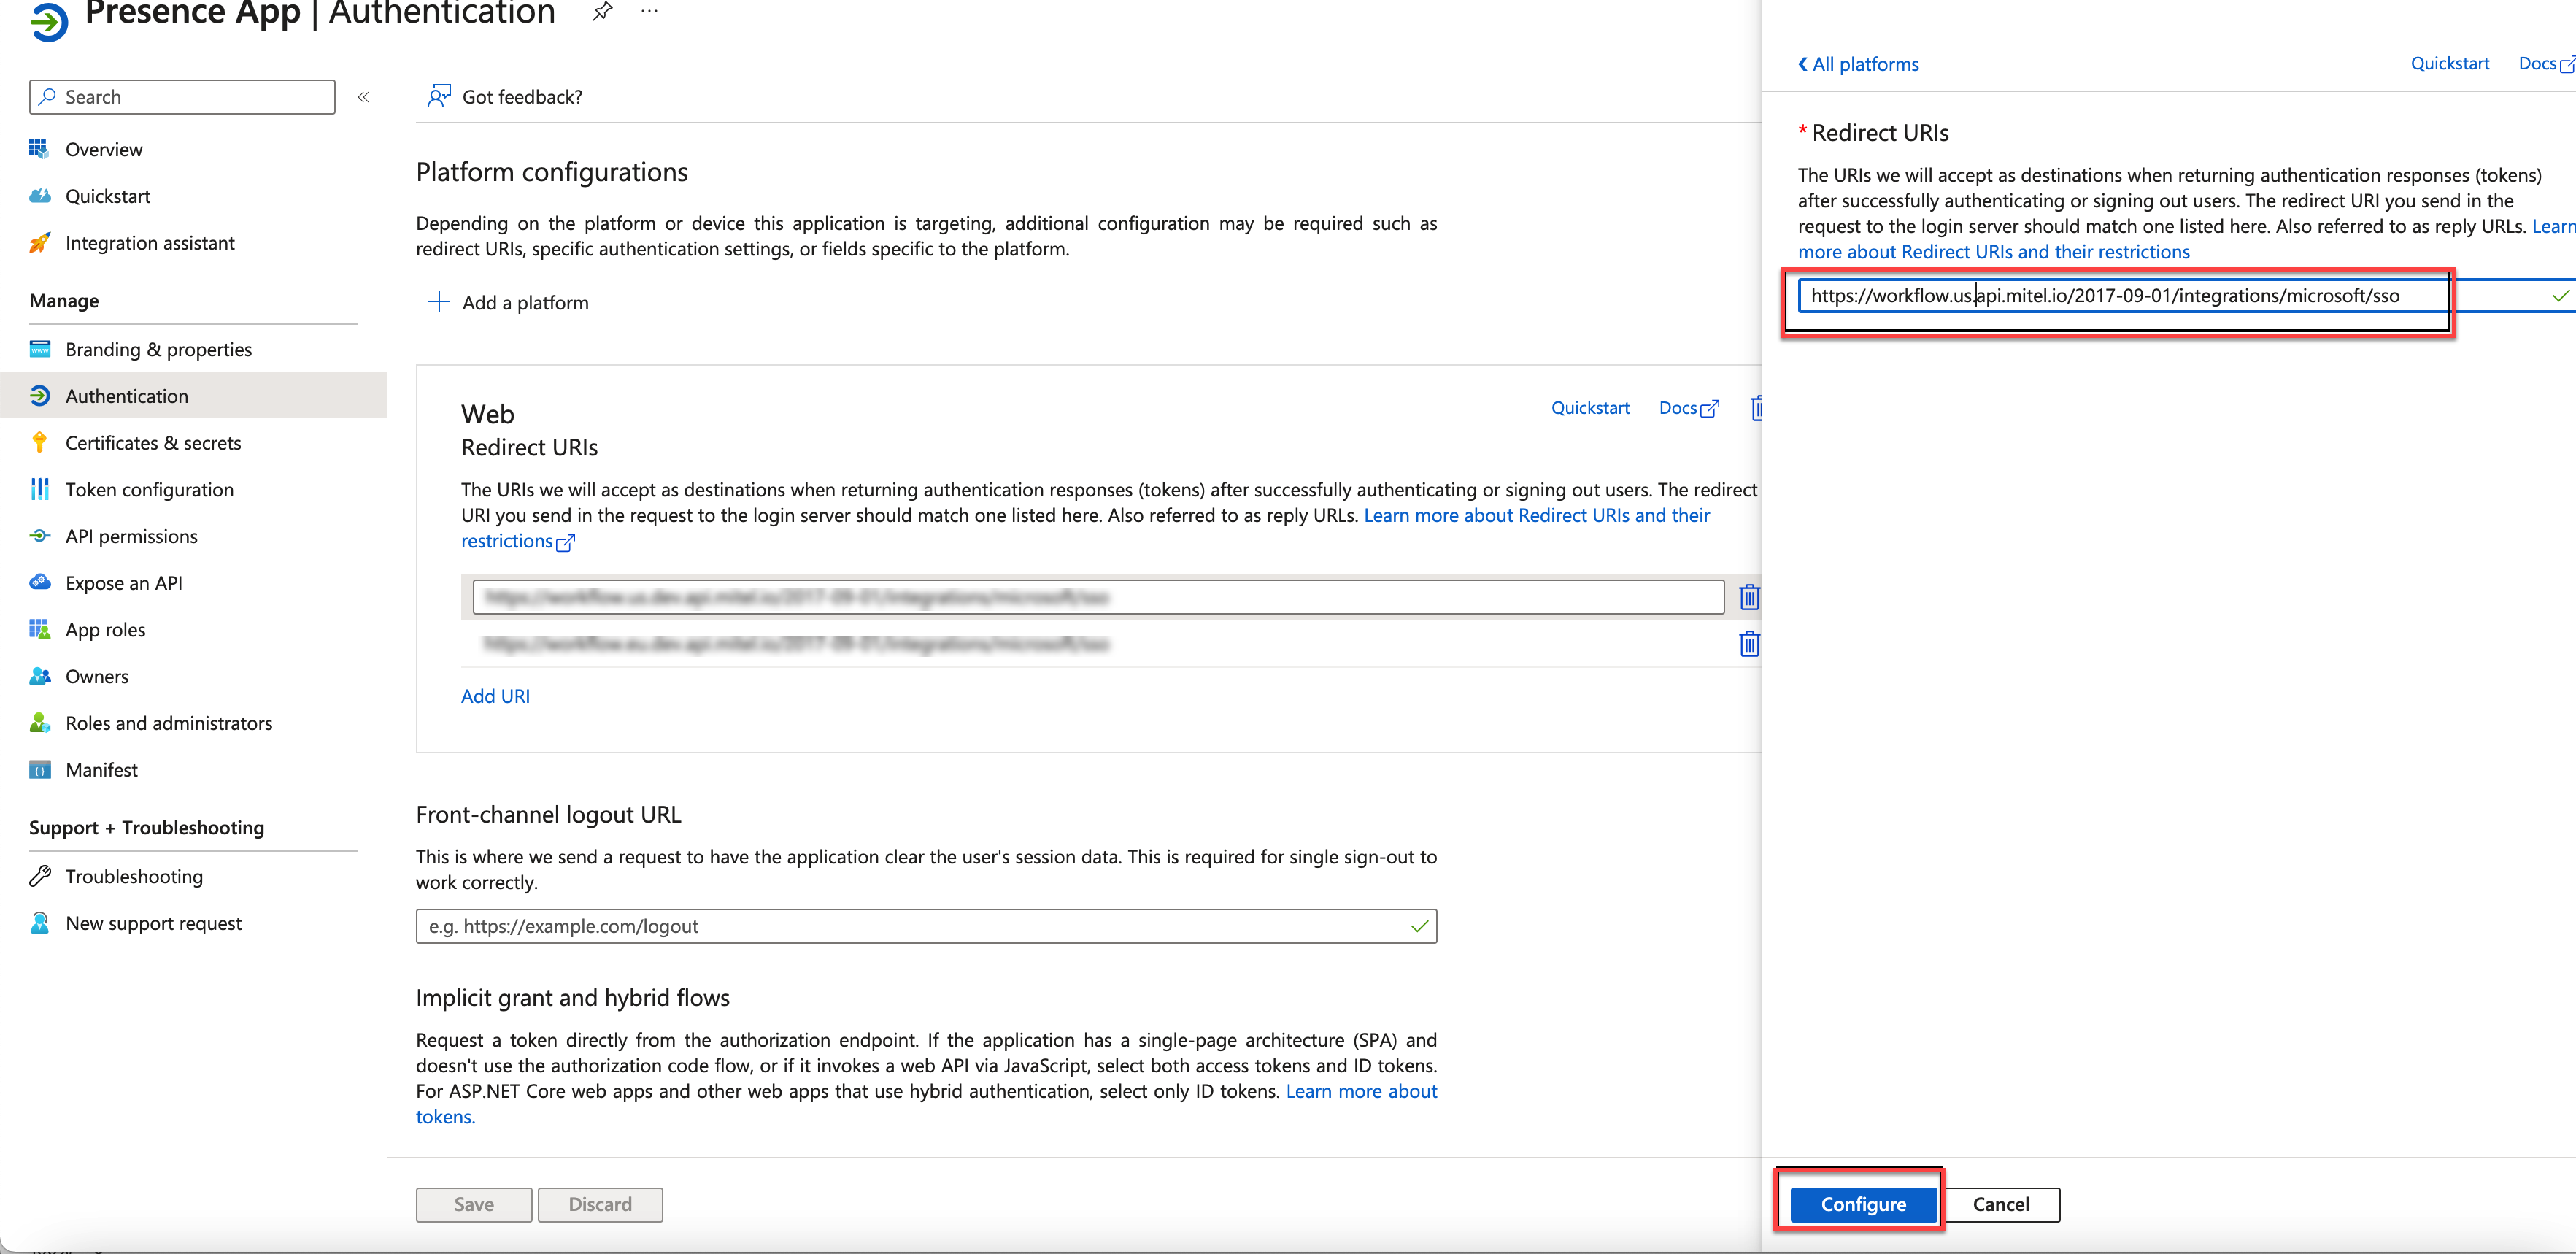
Under the Redirect URI (optional), select the platform as Web and create a Web Redirect URI based on the region your account was initially created as mentioned below. For more information, see Redirect URI.
-
US Cloud https://workflow.us.api.mitel.io/2017-09-01/integrations/microsoft/sso
-
EU Cloud https://workflow.eu.api.mitel.io/2017-09-01/integrations/microsoft/sso
-
AP Cloud https://workflow.ap.api.mitel.io/2017-09-01/integrations/microsoft/sso
Note: If you are unsure about your account's Cloud location, refer Customer Admin Account Information. -
-
Click Register
-
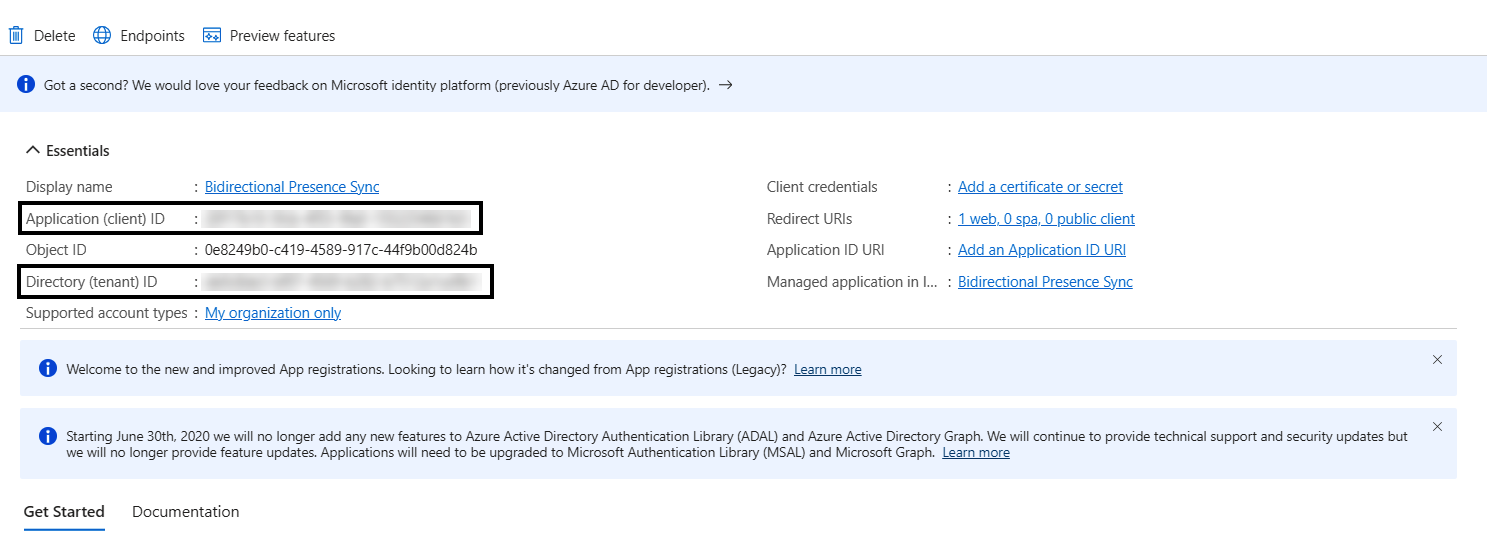
The App gets created with the following details:
-
Application (client) ID
-
Directory (tenant) ID
-
Configure API permissions
-
After the app registration is complete, navigate to API permissions in the left navigation panel and click +Add a permission. The Request API permissions page is displayed.
-
From the right pane, select Microsoft APIs tab and click Microsoft Graph. Select Application Permissions.
The app requires the following permissions for bi-directional sync to work:
Microsoft Graph Permissions Type Description Presence.ReadWriteAll
Application
This is necessary to synchronize presence information from Mitel to MS Teams
User.Read.All
Application
This is required to retrieve the user ID from MS Teams.
Application.ReadAll
Application
This permission is necessary to access and retrieve the permissions and client secret associated with the integration.
email
Delegated
This is required to view user's email address.
offline_access
Delegated
This is required to maintain access to data you have given it access to.
openid
Delegated
This is required to sign users in.
User.Read
Delegated
This is required for get the authorization status of a presence monitor
User.Read.All
Delegated
This is required for presence monitor users to read user ids of MS Teams users, for creating presence subscriptions
Subscription.ReadAll
Delegated
Allows the app to read all webhook subscriptions on behalf of the signed-in user. Presence.Read
Delegated
Allows the app to read presence information on behalf of the signed-in user
Presence.ReadWrite
Delegated
Allows the app to read the presence information and write activity and availability on behalf of the signed-in user. Presence information includes activity, availability, status note, calendar out-of-office message, timezone and location. Presence.Read.All
Delegated
This is required for a presence monitor to read its presence status of all the 650 users.
profile
Delegated
This is required to view user's basic profile.
-
-
Click Add Permissions. For more details on the Application and Delegated Permissions, refer to the Microsoft documentation.
Global administrator consent for API Permissions
-
Navigate to API permissions in the left navigation panel.
-
Click on Grant admin consent for Azure test AD and click Yes in the Grant admin consent confirmation notification.
Client Secret
A client secret is an authentication technique that uses a string value in the Azure application. Essentially, it serves as an application password, utilized to authenticate tokens for accessing Azure applications. After successfully verifying the client secret, Azure AD issues a token, granting access to the specified resource.
Creating Client Secrets
-
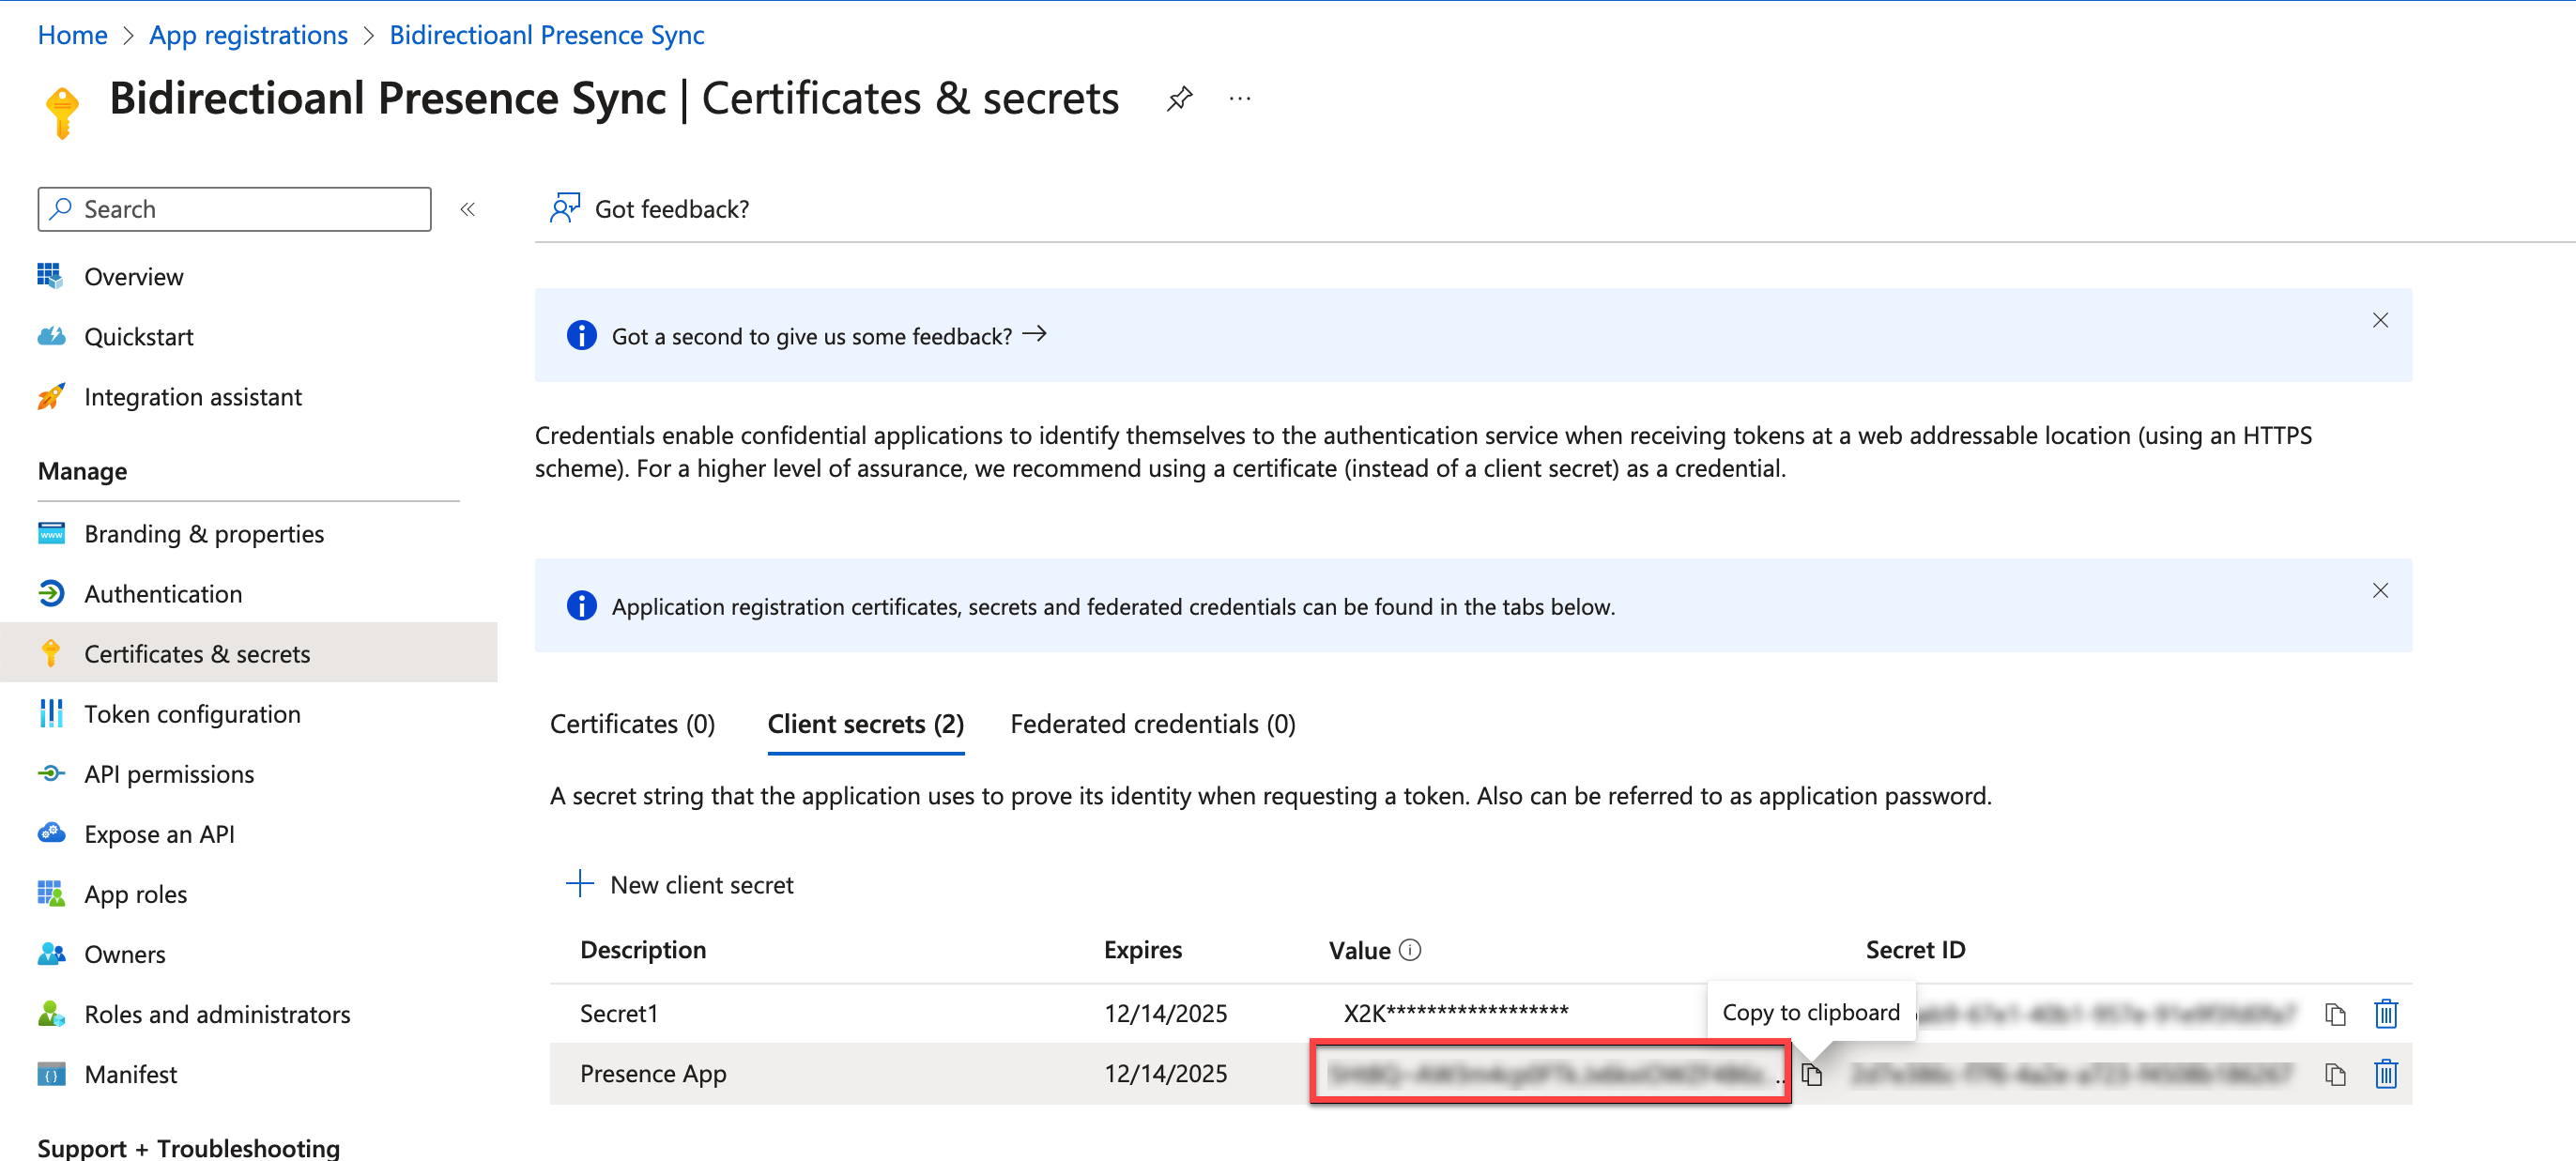
Navigate to Certificate & secrets in the left navigation panel and click the Client secrets tab.
-
Click on + New client secret.
The Add a client secret dialog box is displayed.
Note: The client secret Description field is used for the Name of your integration on CloudLink. This field helps the application determine if the Client Secret is about to or has expired. -
Enter the Description and select the expiry duration. You have the option to choose the expiration duration starting from a specific date to another specific date (with a maximum expiration period of 2 years). Click Add to create the Client secrets.
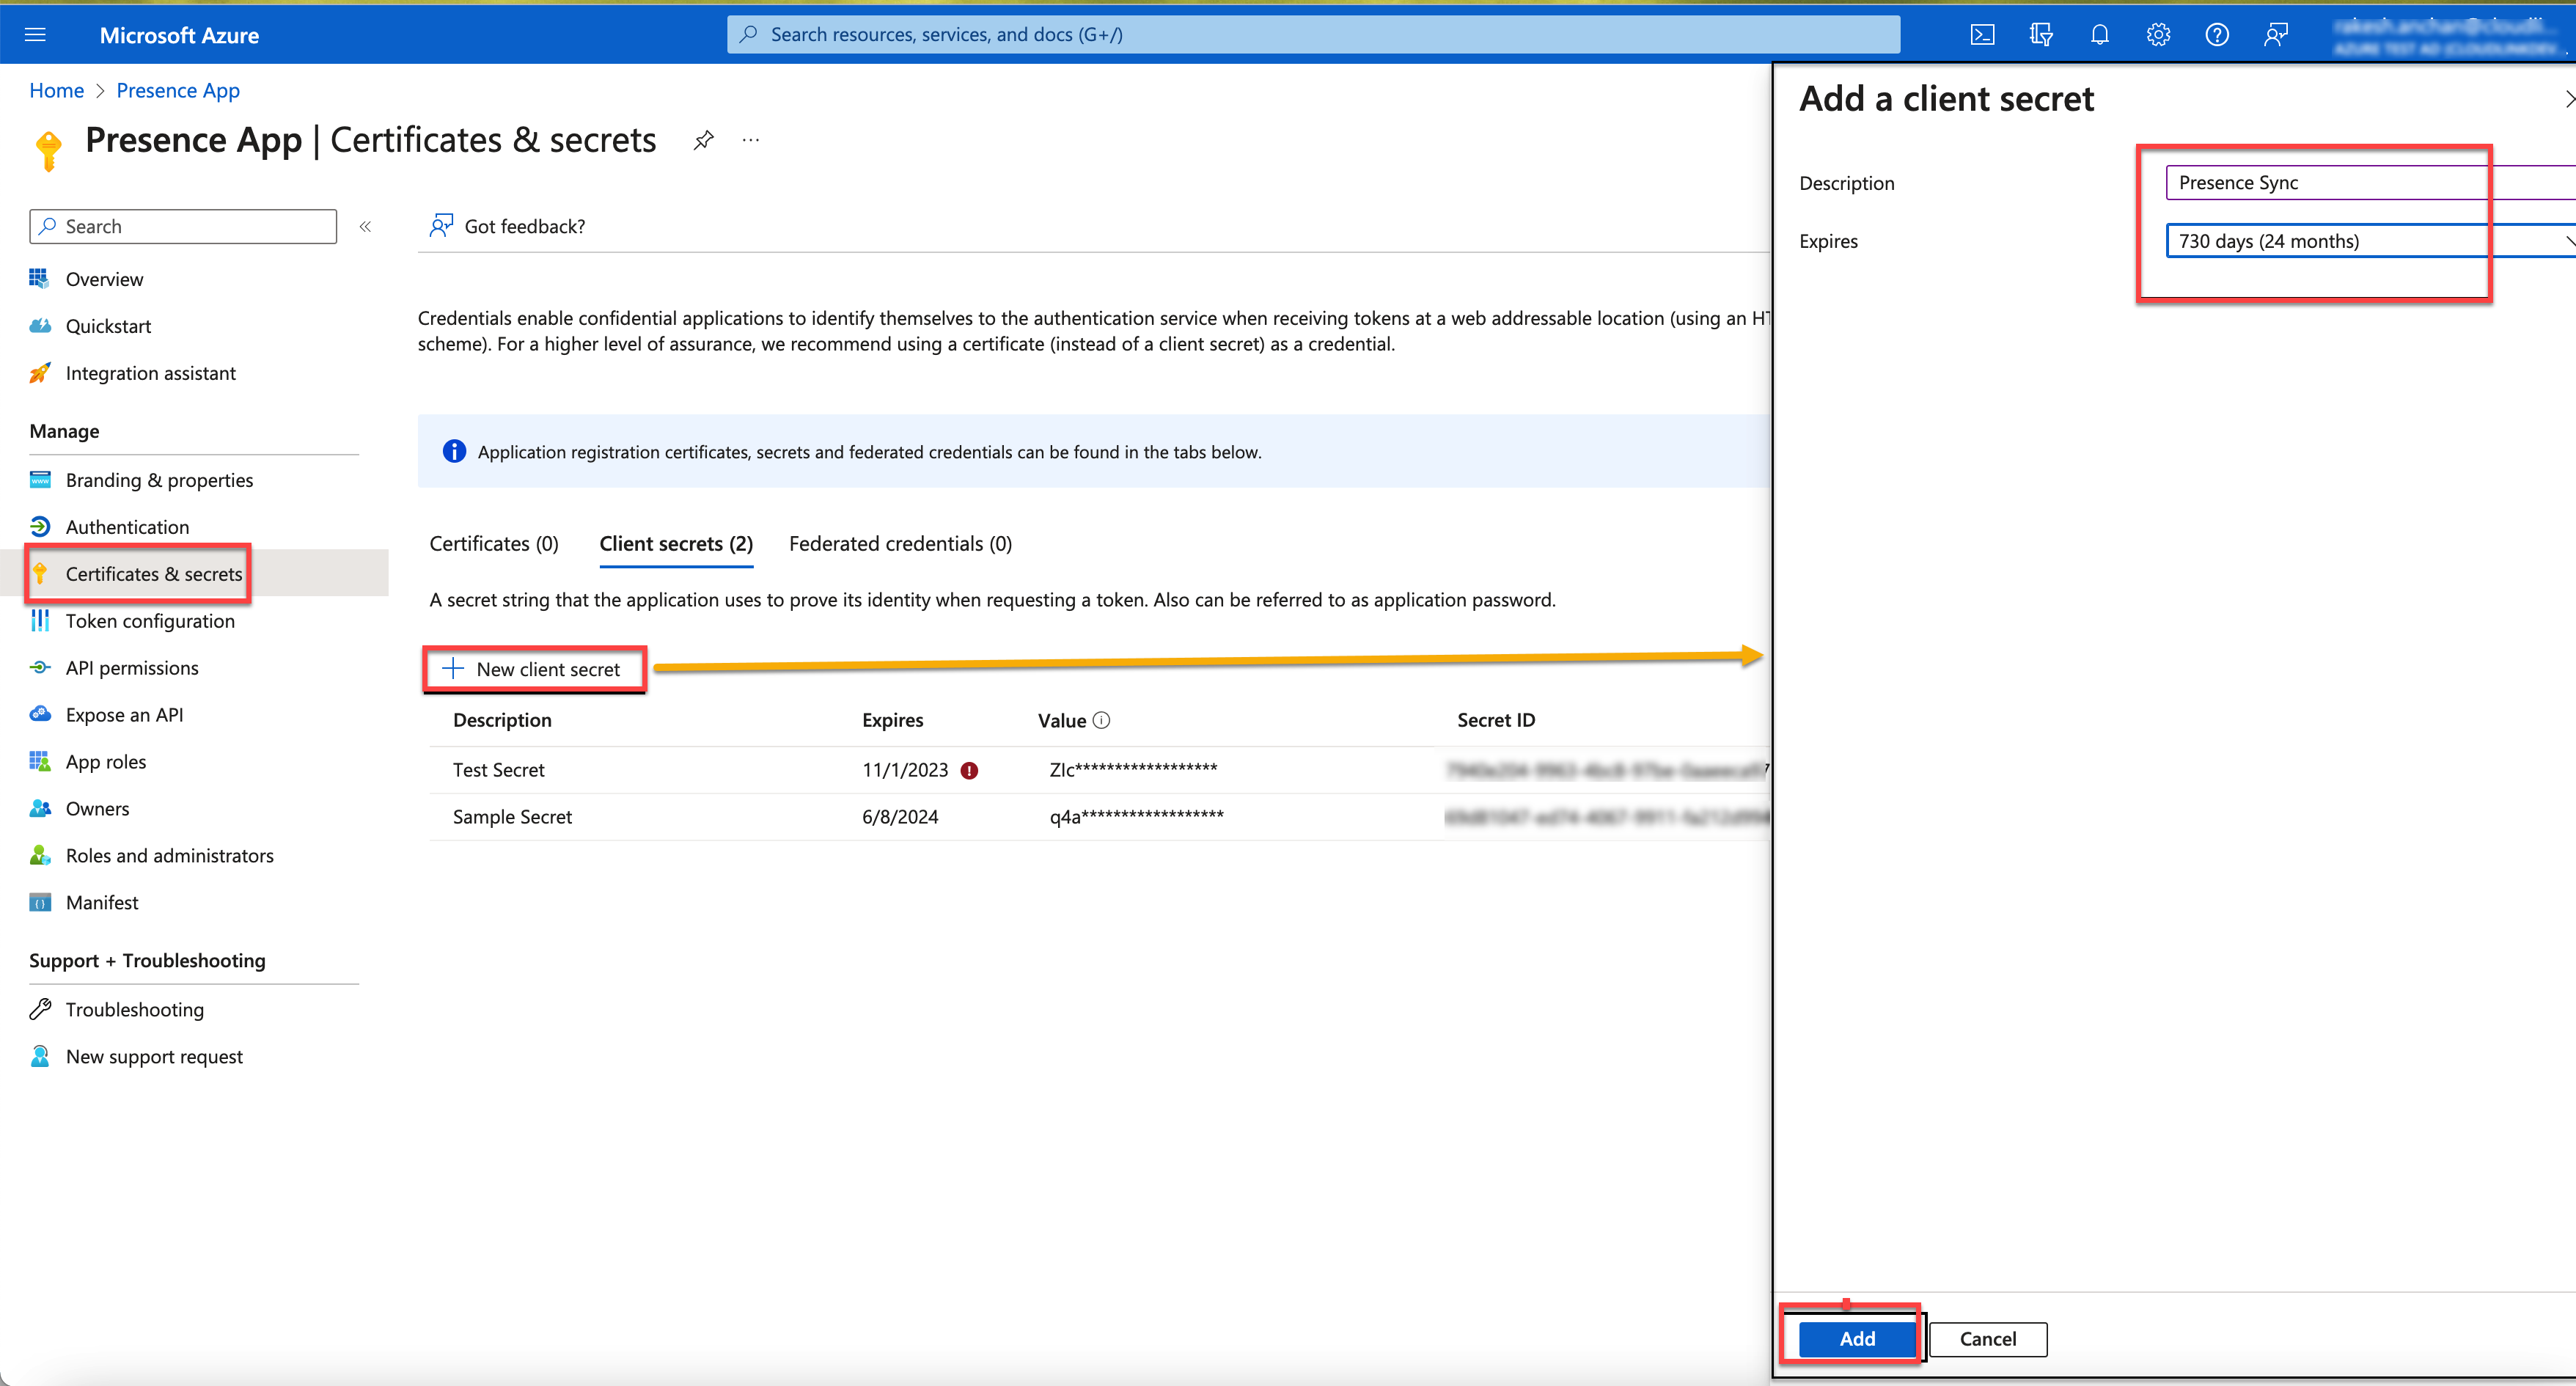
-
Once the client secrets are generated, copy the description of the client secret under the Description column and save the secret for account console configuration.
When creating client secrets, it's essential to adhere to best practices and consider key points to ensure the security and proper functioning of your application. Here are some points to remember:
-
Create one secret for the MS Teams feature.
-
Create individual client secret for each presence monitor. The best practice is to have a separate secure client secret for each monitor.
-
It's recommended to enter a meaningful value in the Description field to help keep the client secrets organized.
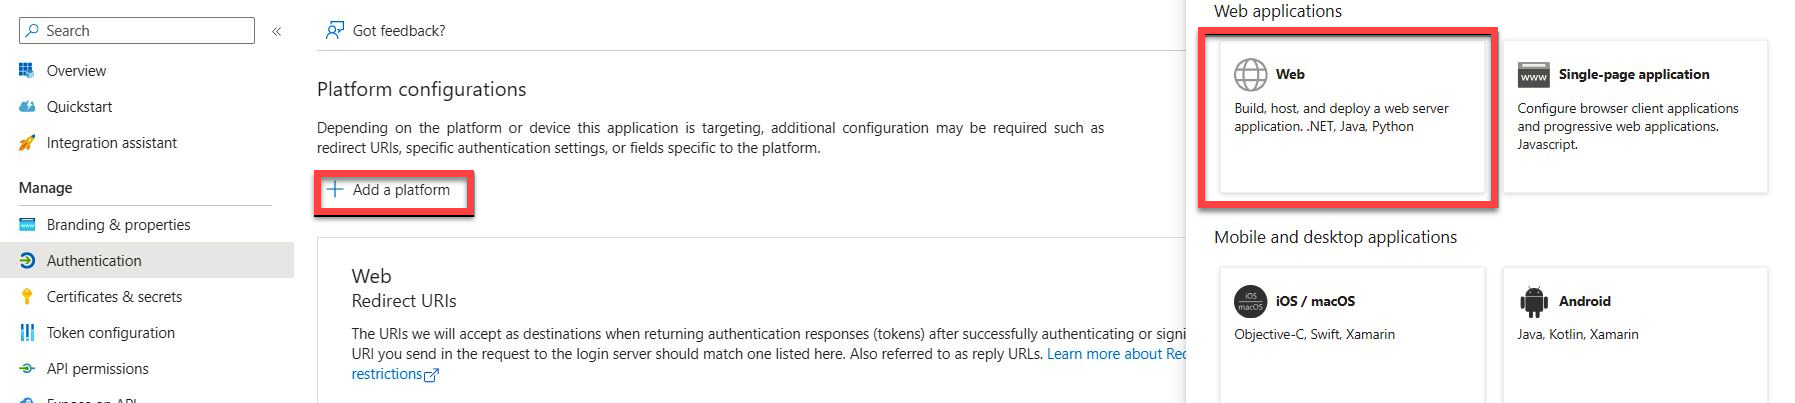
Redirect URIs
A redirect URI is the destination where the authorization server directs the user after the successful authorization of the app, resulting in the issuance of an authorization code or access token.
-
Navigate to home page of Azure application.
-
Open the Redirect URIs link.

-
Click on Add a platform and select Web.
-
Under the Redirect URI (optional), select the platform as Web and create a Web Redirect URI based on the region your account was initially created as mentioned below.
US Cloud https://workflow.us.api.mitel.io/2017-09-01/integrations/microsoft/sso
EU Cloud https://workflow.eu.api.mitel.io/2017-09-01/integrations/microsoft/sso
AP Cloud https://workflow.ap.api.mitel.io/2017-09-01/integrations/microsoft/sso
-
Click Configure.
Create Presence Monitor users
To facilitate the detection of presence changes in the MS Teams applications, Microsoft mandates the creation of a set of presence monitors. Presence Monitors are required for monitoring presence change in MS Teams. The Azure Administrator creates the required number of monitors for presence synchronization, as specified in the Mitel Administration.
Perform the following steps to create Presence Monitors:
-
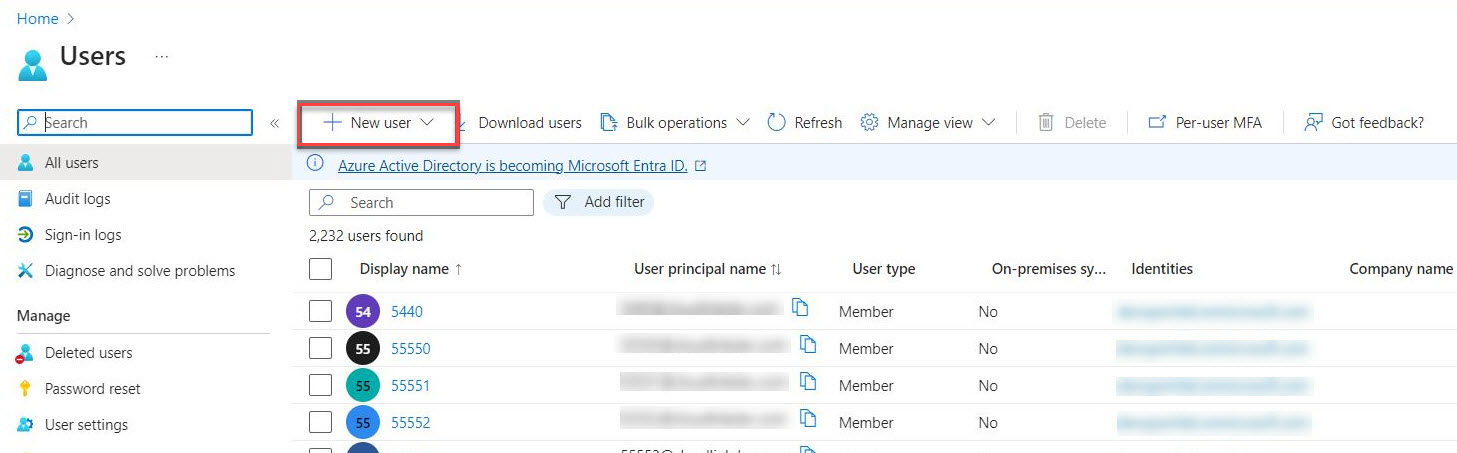
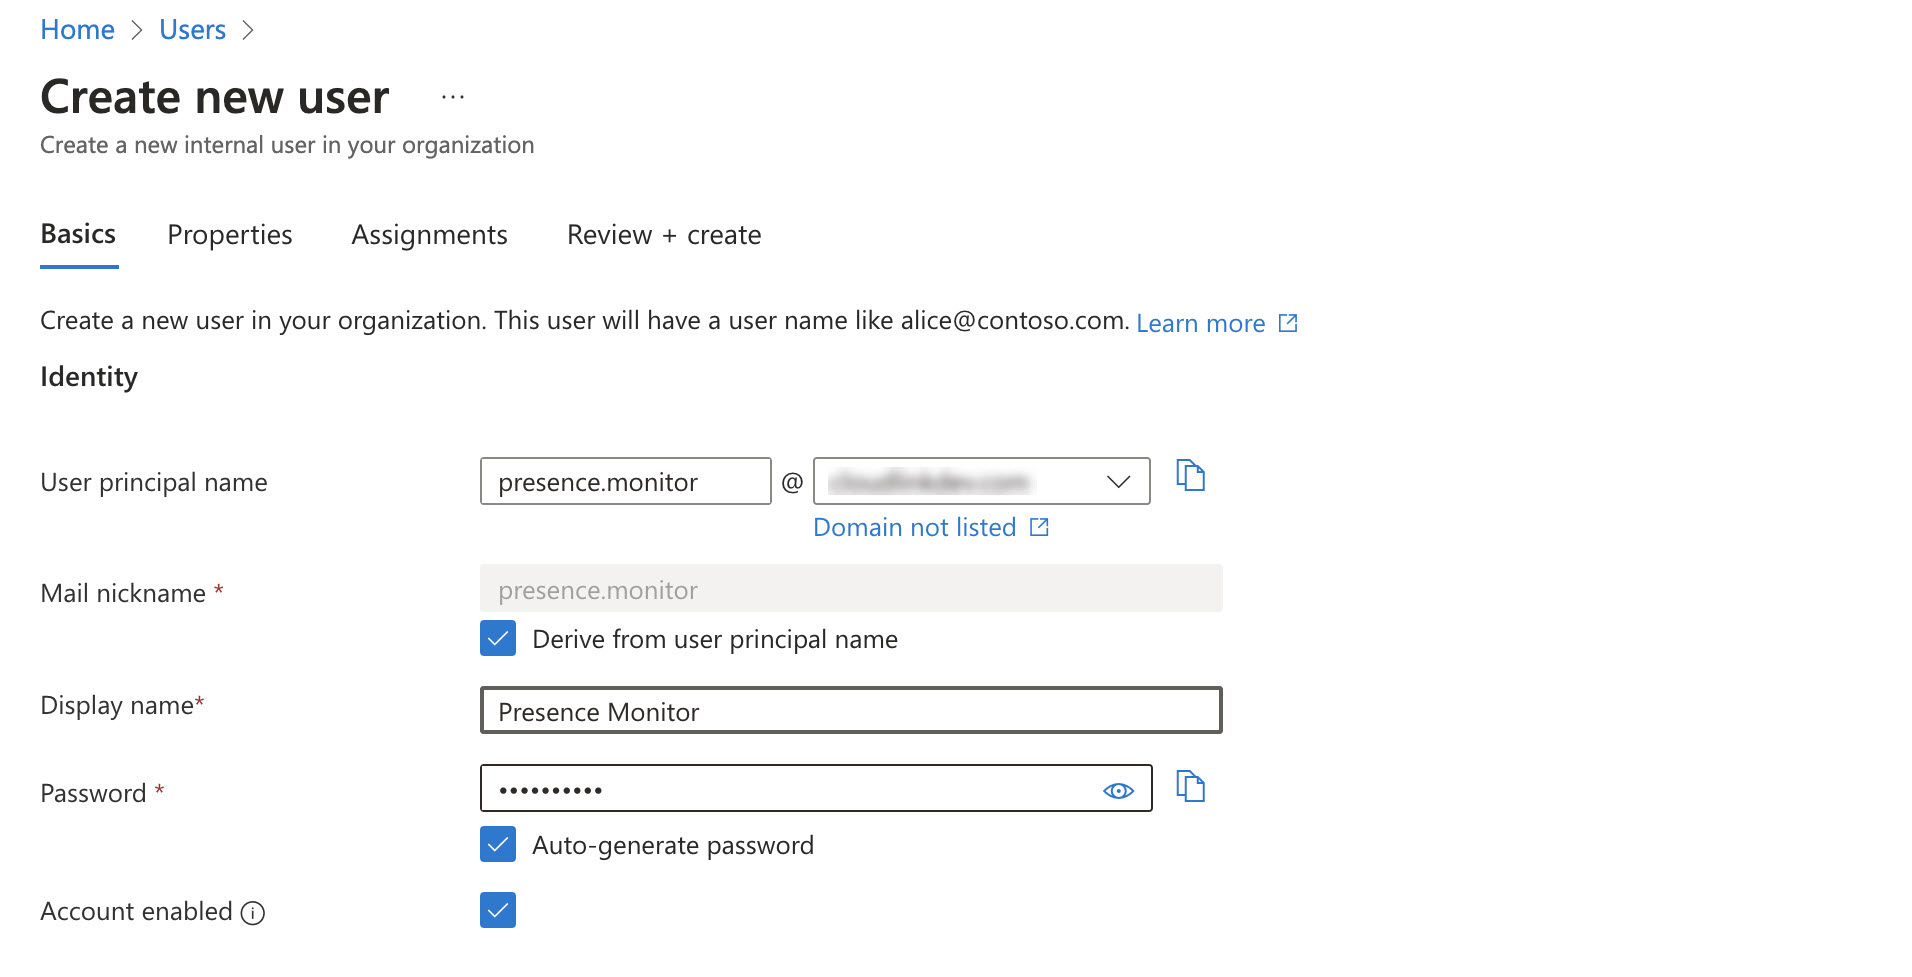
In the Azure Portal, navigate to the Users page and click on + New User. Select the Create new user option.
-
In the Create new user page, the following field values should be entered under the Basics tab:
-
User principal name
-
Display name
-
Password - password can be auto-generated or manually created.
-
Account enabled - this option should be enabled, otherwise the user will be blocked from logging in.
-
-
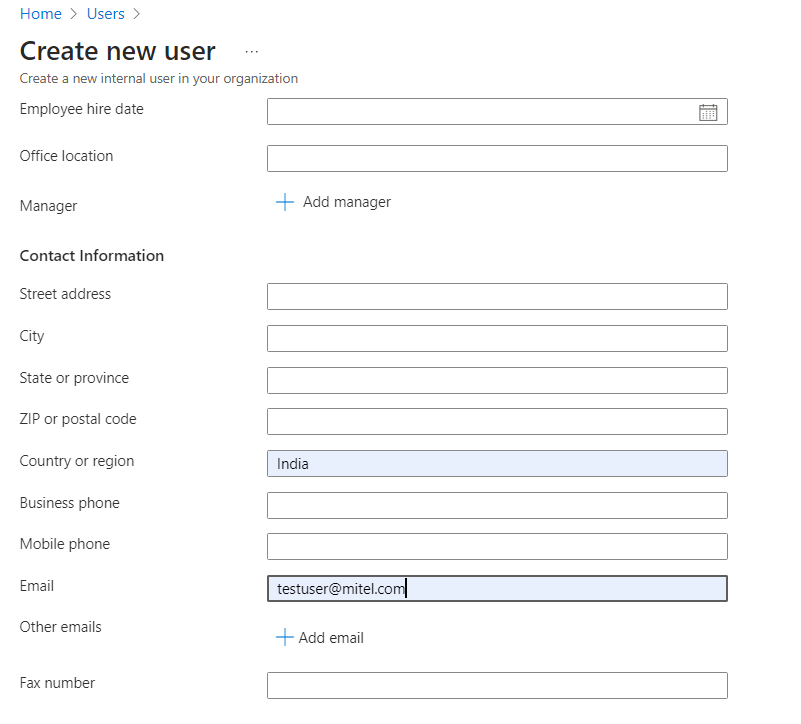
Next, under the Properties tab, set the Email of the user.
-
Click on Review and +Create to create a new user.
A new Presence Monitor User is created.
Note:-
Avoid setting up global administrators as presence monitors. As global administrators possess access to all resources, the workflow may receive unnecessary data that is not essential for its operation.
-
Azure Administrator must have a list of users' principal names and client secrets for each created monitor and send them to the CloudLink Administrator. If the CloudLink Administrator authorizes these monitors, the passwords for each monitor must be then sent to CloudLink Administrator.
-
Integrating Microsoft Teams with a Customer Account (existing customer)
There are two options for the customers with Unidirectional presence sync feature enabled to configure Microsoft Teams:
-
Administrators can delete the existing Azure application, configure presence monitors and create new Azure applications with configuration as mentioned in Bi-directional presence .
-
An alternative approach involves the Azure Administrator maintaining the current Azure application configuration outlined in the Unidirectional presence section. Additional configuration steps, beyond those specified in the Unidirectional presence section, will be necessary in this scenario as follows:
-
Create Presence Monitors. Refer to section Create Presence Monitor users for the steps.
-
Add Redirect URI, as outlined in section Redirect URIs.
-
Create Client secrets as detailed out in Client Secret section.
-
Add the additional API permissions for the following from the Configure API permissions section:
-
User.Read.All
-
Presence.Read.All
-
Presence.Read
-
-
Configuring the Bidirectional Presence feature in Mitel Administration (as CloudLink Administrator)
After integrating Microsoft Teams with a customer account, you can enable the Bidirectional Presence feature for the customer account. The synchronization of the Presence feature involves a two-step process. In the first step, the presence synchronization of the presence status of the user takes place from CloudLink to MS Teams which is also called as Unidirectional Presence (refer to the section on Unidirectional presence for details), followed by the presence synchronization between MS Teams to CloudLink, which is also known as Bidirectional Presence.
-
In the Mitel Administration, navigate to the Account > Integrations panel. Under Microsoft Teams, slide the toggle button to the right and activate Sync presence from MS Teams to CloudLink option.
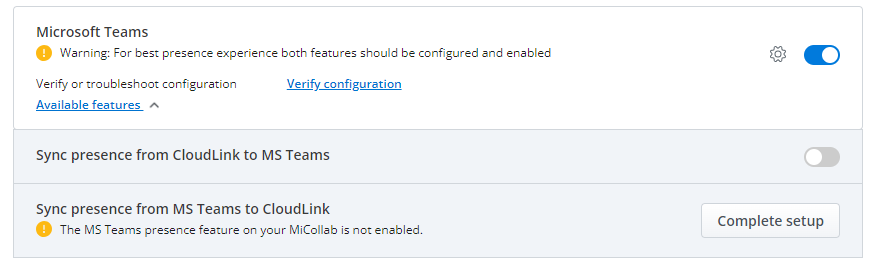
-
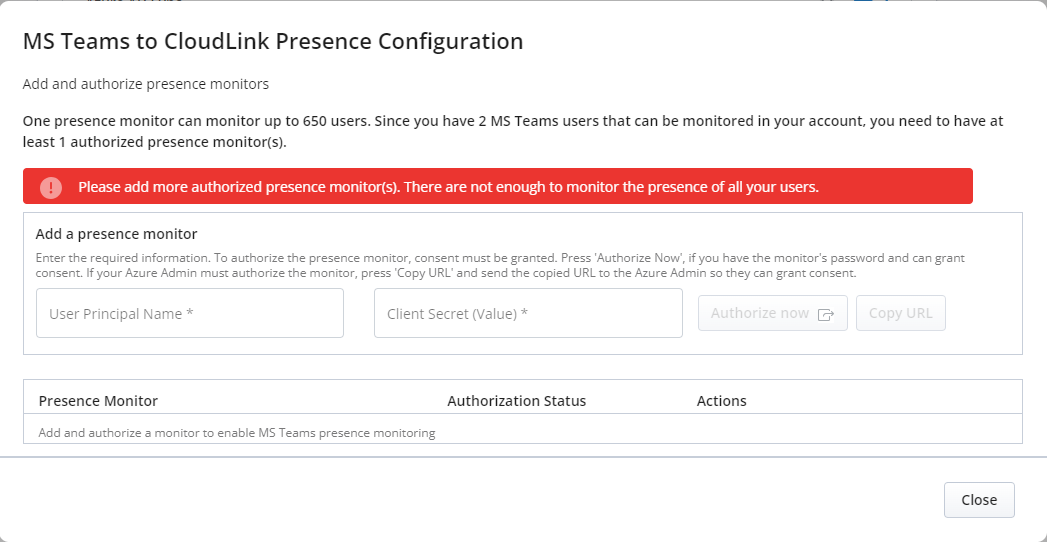
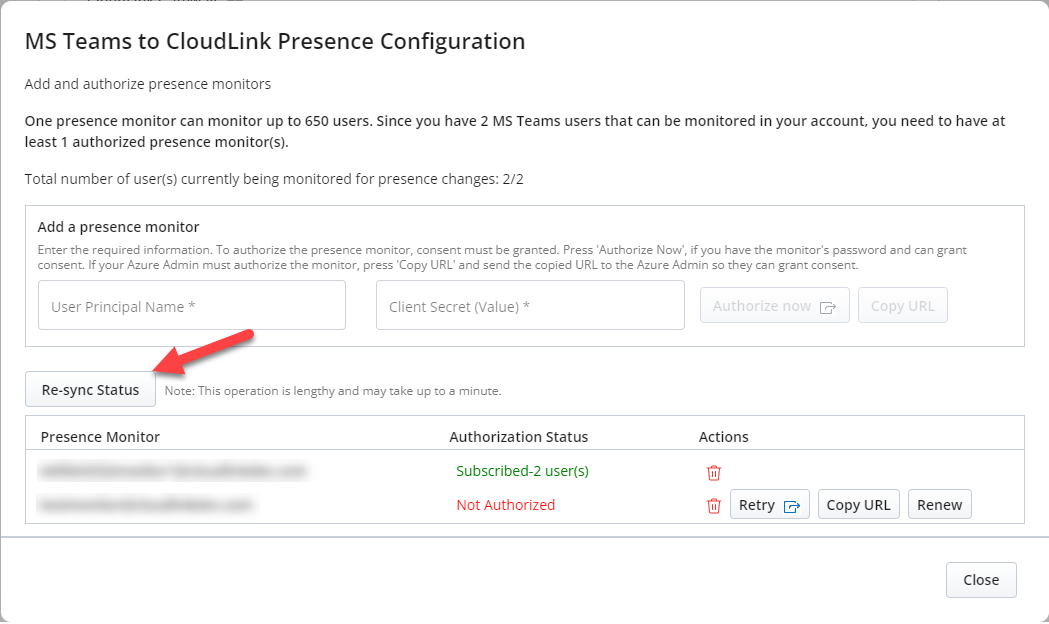
Click Complete setup. The MS Teams to CloudLink Presence Configuration window opens. If the monitor is not setup, it is highlighted in red in the window.
-
To add the Presence monitors that were created in the Azure portal, enter the values in the following fields:
-
User Principal Name
-
Client Secret (Value) - the value is found in Microsoft Azure Portal > App registrations > Certificate & secrets
-
-
There are two ways to authorize each monitor that is added: Authorize now and Copy URL.Note: The Authorize now and Copy URL buttons will remain disabled until both the User Principal Name and Client Secret are specified.
-
Authorize now - assumes that the CloudLink Administrator (Mitel Administrator) has been provided passwords for each presence monitor. Once Authorize now button is clicked, the Mitel Administrator (CloudLink) is asked to provide a Password to the CloudLink Administrator for each Monitor entered.
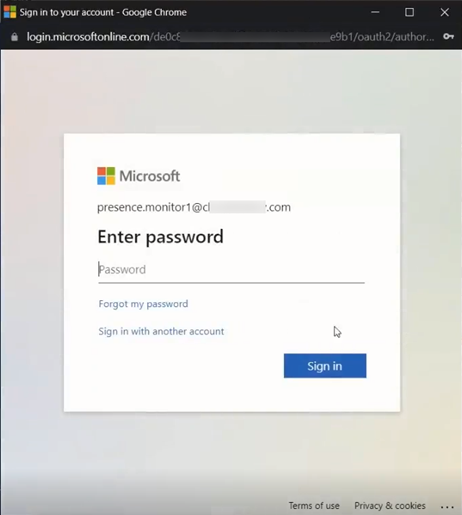 Note: If Multi-factor Authentication (MFA) or other security measures are in place, further steps may be required.Once the authorization is successful, a notification stating the same appears in the MS Teams to CloudLink Presence Configuration window. The added Presence Monitors are displayed in the list below. The Authorization status of each Presence Monitor indicates whether it is authorized or not. The Actions column contains a set of actions that can be performed on a presence monitor, and these actions are dependent upon the monitor's authorization status.
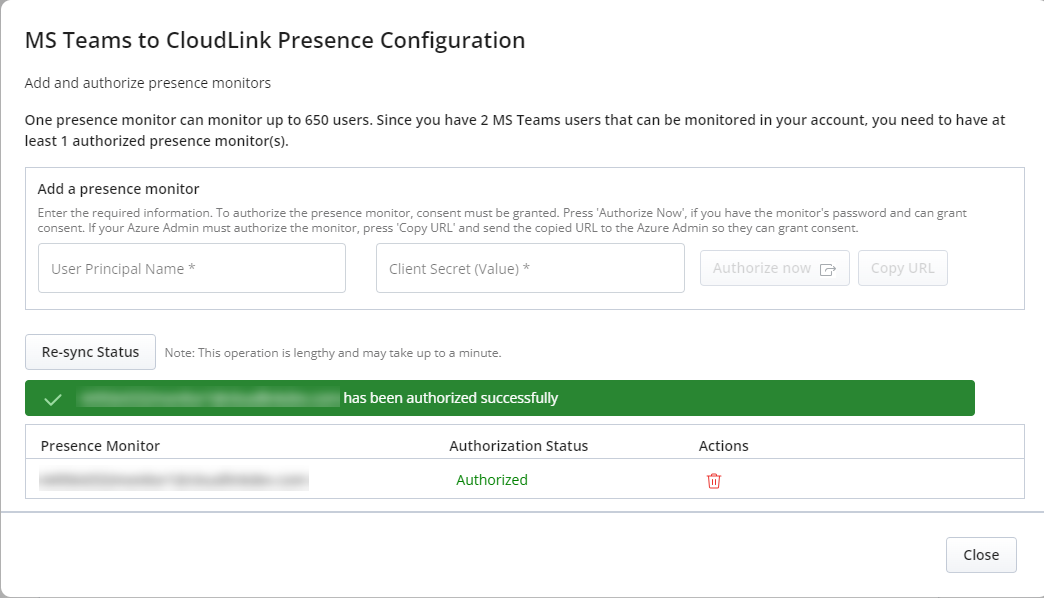
 Note: The upper section of the dialog provides details on the number of users within the customer account that can be monitored, along with the corresponding information on how many presence monitors need to be created to effectively monitor those users. When the feature is on it also show the number of users subscribed
 -
Copy URL - allows the Microsoft Azure Administrator to authorize each presence monitor. If the presence monitor is not authorized, the Administrator has several options: The Mitel Administrator clicks the Copy URL button. The copied URL is sent to the Azure Administrator for authorization.
-
Once the authorization from the Azure administrator is completed, click Re-sync Status.
-
-
-
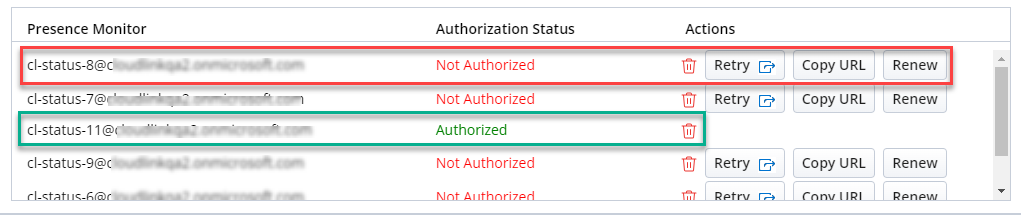
Action buttons:
-
Delete button: The administrator can delete the presence monitor by clicking the delete
 icon.
icon. -
Renew button: If the client secret has expired or needs to be updated, clicking Renew button allows the user to update the client secret.
-
Retry button: When the monitor status shows "Not Authorized", Retry button can be used to invoke the authorization process. Retry button has the same functionality as Authorize Now button.
-
-
After all the monitors are added, click Close button.
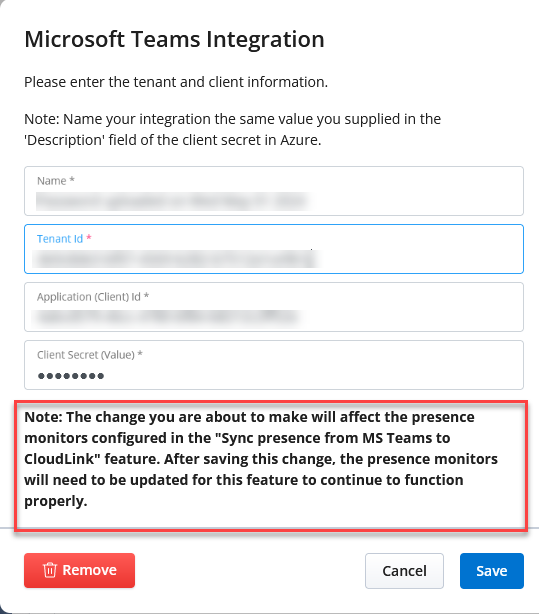
Updating the Microsoft Teams Tenant Id and/or Client Id
If the Microsoft Teams Integration tenant and/or client Id is required to be updated, this will also affect the presence monitors created for the Sync presence from MS Teams to CloudLink subfeature. This is due to them sharing the same tenant and client Id. If the tenant and\or client Id is updated, then the monitors subfeature will stop functioning until they are renewed.
-
Edit the Microsoft Teams Integration and change the tenant Id and/or the client Id. If there are existing monitors, the Administrator will be notified of this change.
-
Click Save.
-
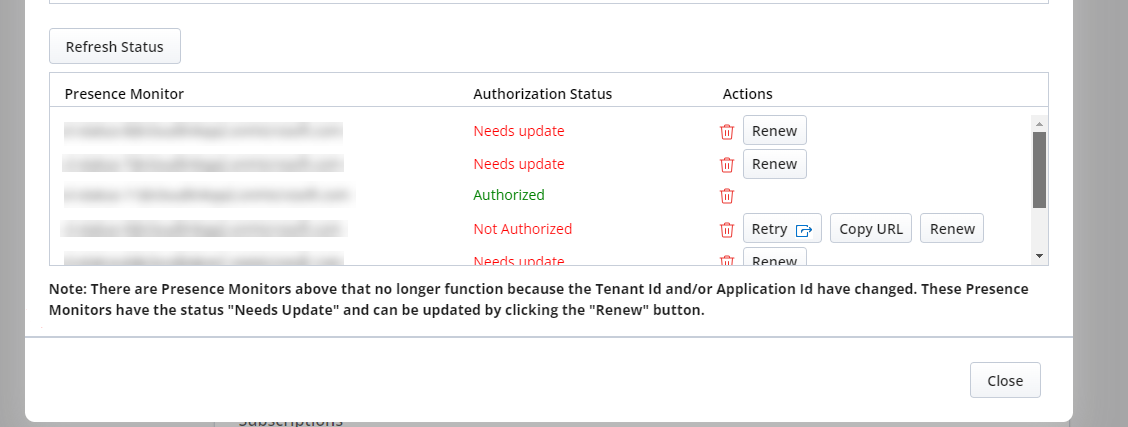
Go to MS Teams to CloudLink Presence Configuration and click Renew button for each monitor that shows "Needs update".
-
Enter the New client secret. Click Authorize now. This will update the monitor's Tenant Id and Client Id secret.
Verifying MS Teams configuration
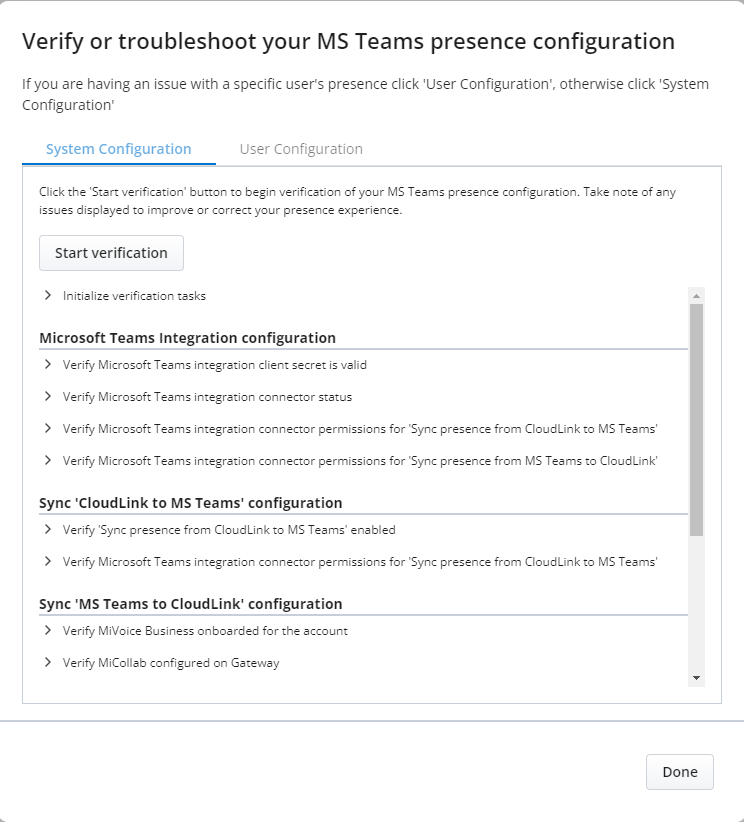
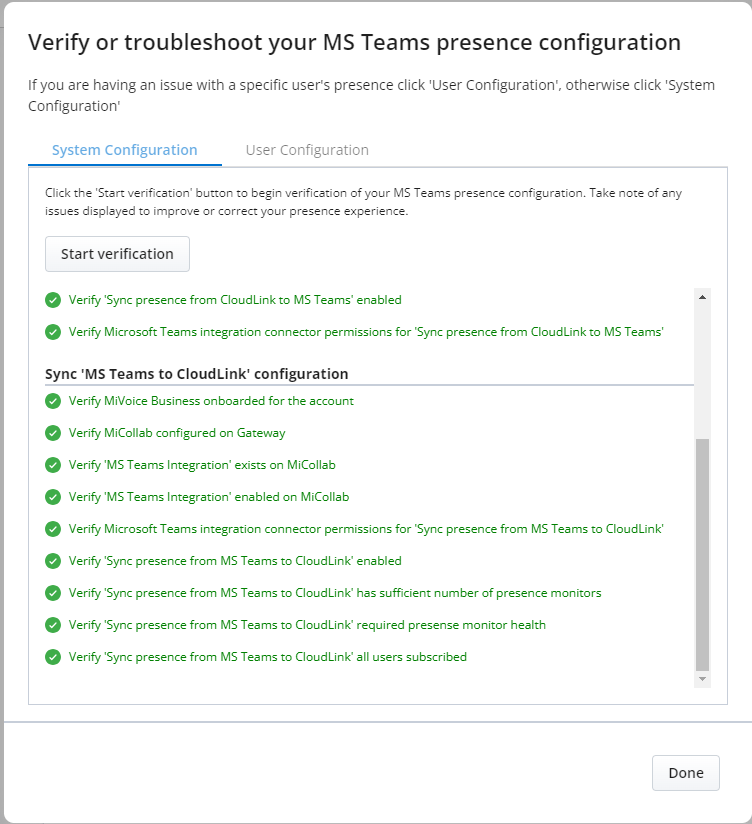
To verify or troubleshoot the configuration of the MS Teams integration, follow the steps below:
-
In the Mitel Administration, navigate to Integrations & Apps. In the Integrations panel, click Verify configuration associated with Microsoft Teams.

-
"Verify or troubleshoot your MS Teams presence configuration" window is displayed.
-
Click Start verification.
When all the tests run successfully
Configuration issues present
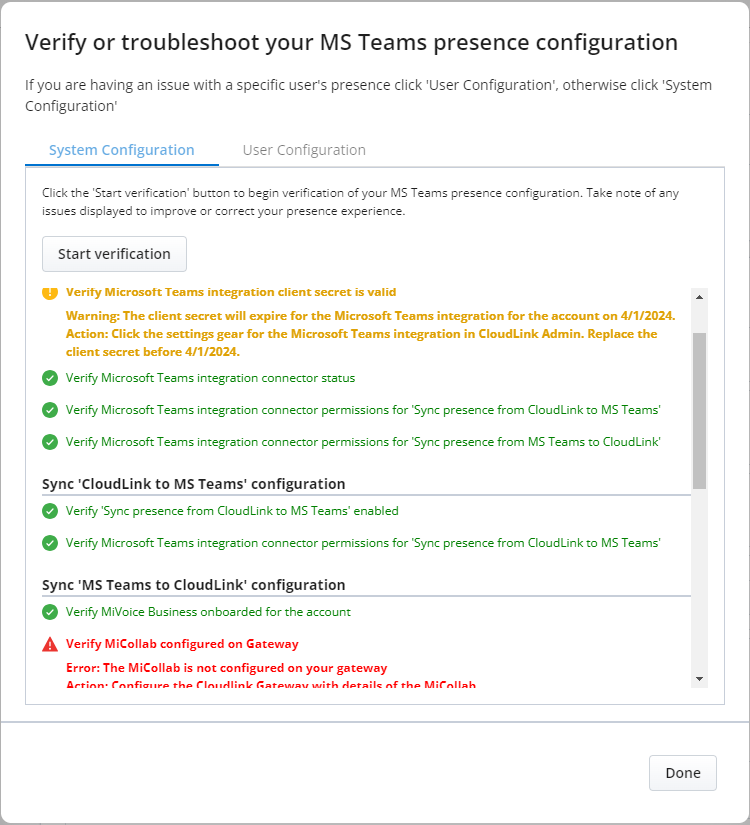
For every error encountered, there's a corresponding action to rectify the error(s), click Start Verification until all the tests run successfully.
-
User Configuration - User Configuration enables the CloudLink Administrator to investigate the issue.
Use Case 1: Issue with a specific user's presence:-
Select User Configuration tab.
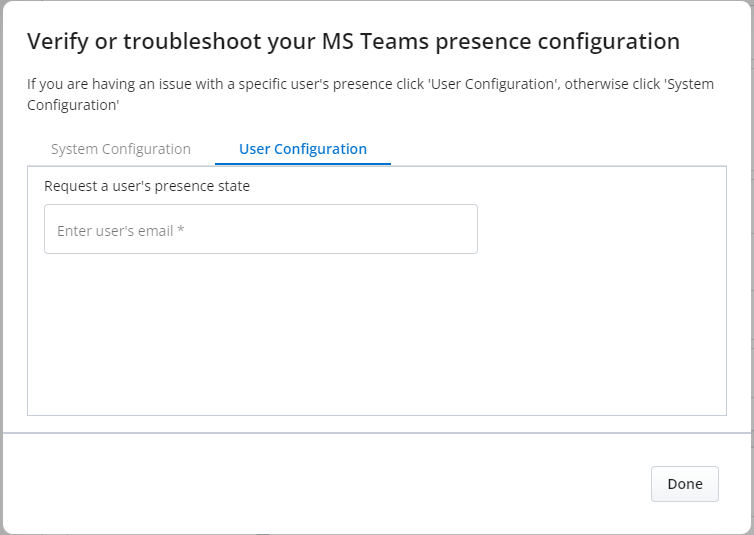
-
Request a user's presence state by entering user's email. Once the email is provided, Get presence button appears.
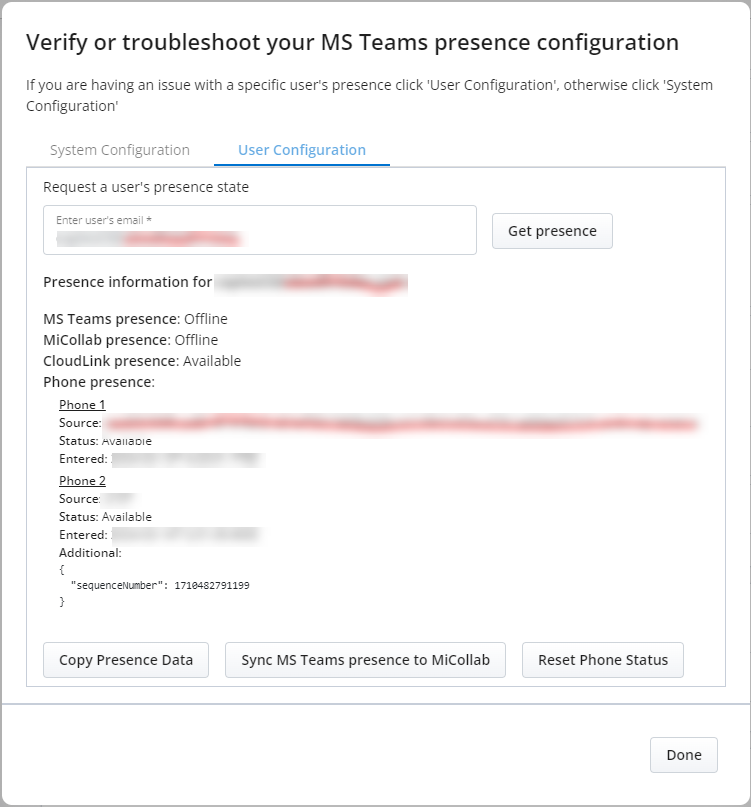
-
Click Copy Presence Data to copy the data. Report the issue following your standard process.
-
Click the Reset Phone status and then click Sync All MS Teams presence to MiCollab.
-
Click Done.
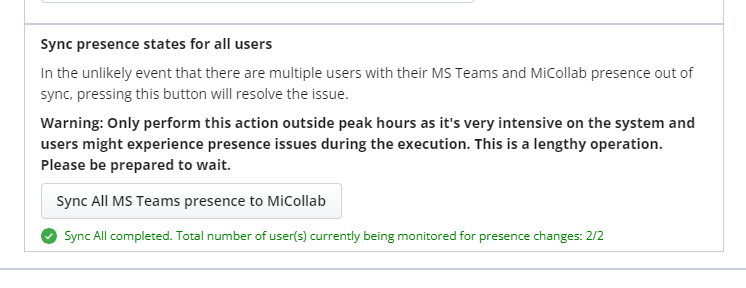
Use Case 2: Multiple number of users out of sync.
When all the tests run successfully after clicking Start Verification in the System Configuration tab, the following steps must be performed:-
Select User Configuration tab.
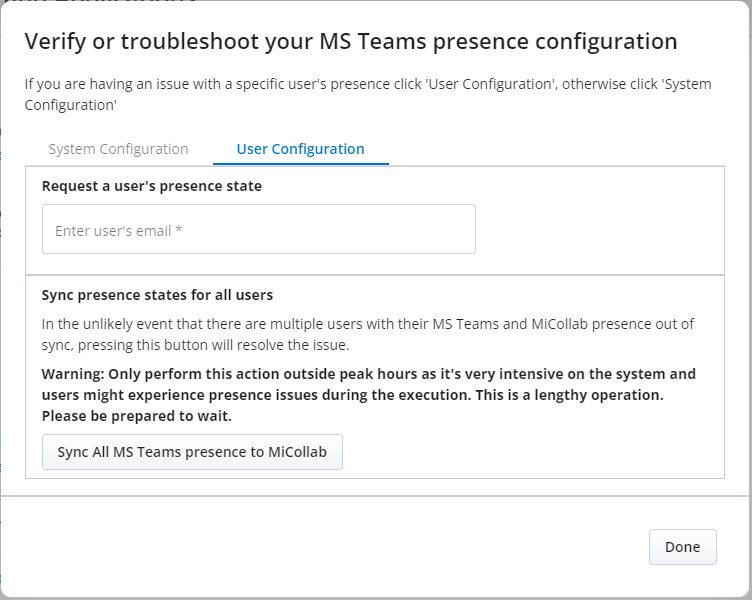
-
Click Sync All MS Teams Presence to MiCollab.
"Sync all completed..." message is displayed.
-
Click Done
-